


Are you an aspiring voice over artist who wants to increase recording quality? Then you need to know how to do voice overs the right way.
Thankfully, you can do it without spending a grand on a professional studio. Recording voiceover with a proper room and technique at home can yield a similarly amazing result.
So, what are voice over tips for beginners? In this article, we will explain how to record a voice over at home in simple steps. Read along!
How to Do Voice Overs?
The answer to how to do a voice over is simpler than you think. The followings are the easy steps to create voice over recordings at home:
- Choose a Good Room as A Studio
- Set Up Recording Equipment
- Prepare A Script
- Set Volume Levels in Your Recording Software
- Find The Right Microphone Position
- Prepare for Voice Over Recording
- Record Your Voice Over
- Edit Your Recording
- Export Your Recording
Let’s learn what to do in each step of VO recording below.
1. Choose a Room for Recording
Having a quiet environment is one of the most important factors in recording voiceovers. Since there can be various sources of noise around the house, you need to pay attention to a few things when setting up a home recording studio.
The first and most obvious one is to use the quietest room in the house. To make it more silent, you can turn off appliances around the room, like air conditioning and refrigerator, during recording sessions.
Before going to the next step on how to do voice overs, though, you also need to pay attention to the room’s furnishing as it can amplify echoes and decrease your audio quality.
Generally, a room that is covered with soft material has less reverberation than one that has more hard surfaces. That is why bedrooms are typically better than bathrooms or kitchens as a home studio.
Apart from the furnishing, room size also matters. Tiny spaces produce echo easily, while a room that is too big makes your voice sound distant. Thus, how to do voice overs involves choosing a regular-sized room for VO recording.
Once you list all spaces that fulfill the above criteria, it is time to test them. Try to clap or talk loudly inside the room and see if you can hear any echo. If so, you can add more soft furniture to that room.
2. Set Up Recording Equipment
When it comes to how to do voice overs, you do not need to think too much about equipment. All you need for a decent studio setup includes:
- A PC or laptop
- Headphones
- A microphone
- A recording software
We will not dive deep into what computer to use for voice over recording because any standard PCs and laptops will do. As long as you can use it to run recording software smoothly, it is good to go.
Similar to computers, you do not need high-end headphones. You only need to get a pair that has enough clarity to let you hear details in recordings, which is important in the editing process.
The good thing is, some of them retail for less than $100. The examples include Sennheiser HD280 Pro and Sony MDR-7506.
Now let’s move on to the essential equipment regarding how to do voice overs: the microphone.
Even though professional voice over studios use top-of-the-line mics, there are decent options between $50 to $100 these days. Though affordable, those microphones are clearer than built-in mics on laptops and earphones.
Not sure which microphone to get? You can check our article on cheap gaming mics since they also work well for recording voiceovers.
Also, make sure that you get a pop filter for the mic. It will reduce unintentional popping sounds when you pronounce consonants like “p” and “b”. Due to that, it is even better if the mic you choose already comes with the filter.
Related to the microphone is the recording software. Essentially, you can use any recording apps that come with your computer’s operating system. However, they usually do not offer enough features to ensure great recording.
Instead of using that, you can install free software that offers everything you need to record and edit, such as Audacity. We will use it for the tutorial on how to do voice overs later on.
Read : Great Microphone for Streaming
3. Prepare A Script
At this point, you must already have some projects to do. To prepare for them, you already researched the topics and wrote the outline of what you want to present.
But before you ask how to do voice overs, do not forget to write the script first. Ideally, it includes every word that you want to say in the video.
By having a script, you will not have to stop multiple times during recording to remember what to say. Plus, it will prevent you from running into unnecessary ramblings. Therefore, you will be able to save time by eliminating the need for retakes and excessive editing.
Though, it is better to keep your script on a mobile device than on paper. That way, your microphone will not pick up unwanted noises that papers create.
It is also important to practice reading your script aloud before going to the next steps on how to do voice overs. Doing so enables you to practice and avoid mispronunciation during recording.
4. Check The Volume Level in Your Recording Software
Now that you already have a script, it is time to try voice over recording with your software. In this case, we will be using Audacity as an example. It is not necessary to read the entire script since you are doing this to check the volume level in the software.
The ideal volume level should not sound too low or too high. While it is possible to adjust them in editing, getting the right volume level while recording voiceover is more efficient.
So, what is a good volume level for how to do voice overs? In general, your volume should be between -20 to -10 decibels (db) and peaks around -6db. Going above that will make you sound distorted or clipped.
To understand this more, you can take a look at the volume indicator on your recording software. In Audacity, the indicator is on the top right side.

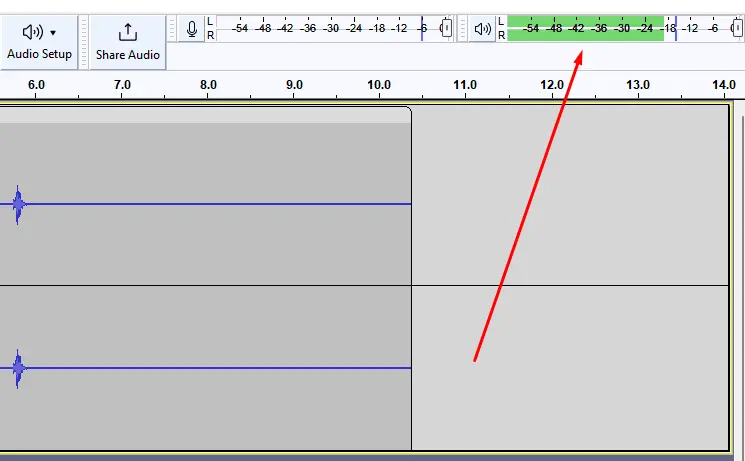
The above example shows that the volume level is kept under -6db, which is safe. If you keep getting over that level, your microphone sensitivity may be too high. You can adjust it in your computer’s audio input settings.
What if the volume level still peaks after sensitivity adjustment? Then, wrong microphone placement can be the culprit, which we will talk about in the next step on how to do voice overs.
5. Find The Right Microphone Placement
Have you ever talked to someone on the phone and their voice gets distorted or muffled by their breath? That happens because the person talks too close to the mic.
However, being too far from the microphone is also undesirable. Doing so will make your voice soft and force you to speak louder, which can result in volume peaking.
That is why maintaining your microphone’s distance is important in ensuring a good voice over recording quality. For the best result, put the mic six to eight inches away from your mouth.
It is also worth noting to place the microphone below the height of your chin. By doing that, you can avoid creating sibilances (excessive “s”) and plosives (popping sound).
Nonetheless, remember that everything we just explained is a general rule on how to do voice overs. Feel free to find the microphone distance that works best for you.
6. Prepare for Voice Over Recording
The next step on how to do voice over is to prepare for the recording itself. You need to do a few essential things for that.
First, make sure that others know you are on a recording session so that they do not make undesired ambient noises. You can do this by putting a sign on your bedroom or apartment door.
Secondly, turn off any electrical appliances that usually produce sounds. Remember to turn your phone silent as well.
Thirdly, check if your microphone is firmly placed. This is to ensure that it will not tumble or vibrate while recording voiceover.
Last but not least, how to do voice overs includes getting into your character. Even if you are not doing a VO recording for a fictional story, getting yourself to sound exciting also takes some time to prepare.
7. Start Voice Over Recording
You are now ready to record! Other than keeping your distance from the microphone, you can try the following tips to improve the result:
- Be aware of your strength. If your video or voice over duration takes minutes, it is normal to divide it into sections. Make sure that you take a brief break between each. This is a much better approach than trying to do the whole script and losing energy along the way.
- Do not stop recording when making a mistake. Just leave yourself a note, such as “That was a mistake, I am redoing this paragraph”. Later on in the editing, you can cut that part and stitch the correct sections.
- Speak clearly, but do not overdo it. This the reason how to do voice overs includes reading the script aloud before recording. By doing so, you will be able to pronounce every word as if in a casual conversation.
- Do not rush. You create voice overs to relay information. Thus, you must speak at a balanced speed. Being too slow will make the audience bored, while being too fast can make them miss your point.
- Pay attention to your tone. Being able to present different emotions is an essential voice artist skill. However, do not exaggerate when shifting pitches or stresses as you will sound unnatural.
8. Edit Your Voice Over Recording
The next step in how to do voice overs is to edit your VO recording. But before you continue, treat yourself with a 10 to 15-minute break. Doing so allows you to have a clear mind for editing.
When you are ready to edit, listen to the entire track first. Take notes of things you do not like from the recording. There can be many elements to look for, but the followings are what you need to prioritize:
- Volume
- Tempo
- Pitch
- Tone
- Noise
- Clipping
- Mouth clicks
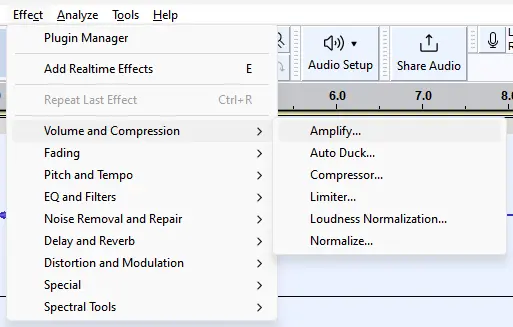
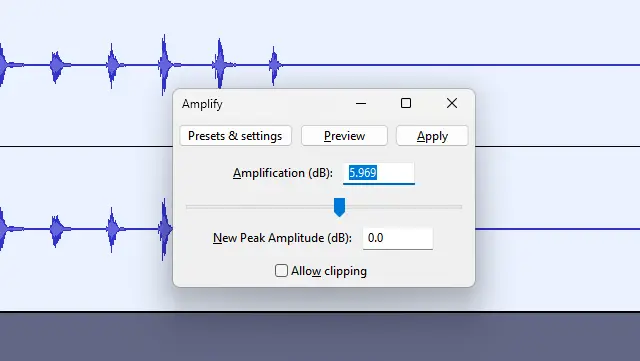
Thankfully, Audacity has features under the Effect menu to adjust the aforementioned elements. To adjust volume, for instance, you only need to click on Effect > Volume and Compression > Amplify.

Once the pop-up window opens, drag the slider to the left to decrease or to the right to increase volume. You may click Preview to check the change. If it is up to your desire, click Apply.

After making volume changes, you may want to deal with the other elements that we previously mentioned. Here are the menus to access the adjustment for each of them:
- Tempo: Effect > Pitch and Tempo > Change Tempo
- Pitch: Effect > Pitch and Tempo > Change Pitch
- Tone: Effect > Pitch and Tempo > Change Tone
- Noise: Effect > Noise Removal > Noise Gate
- Clipping: Effect > Noise Removal > Click Removal
- Mouth clicks: Effect > Noise Removal > Clip Fix
When using those features, it is best to make subtle changes. However, it is not wrong to experiment with the sliders and find what works best when it comes to how to do voice overs.
Now that you have made some changes, it is time to cut unwanted parts from your voice over recording. You can do this in Audacity by clicking and dragging on the part that you want to delete.

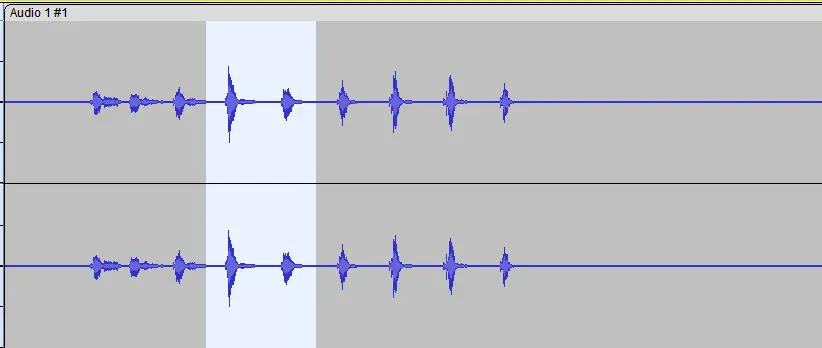
To ensure your selection, you can always click the play button on the toolbar and listen to the selected part. What’s more, you can click Zoom In (represented by a magnifier icon with a plus sign) for a more precise selection.


After that, right click on the highlighted part and choose Cut. Repeat this for other parts that you want to remove.
9. Export The Voice Over Recording
The final step on how to do voice overs involves saving or exporting your VO recording. In Audacity, you can do this by clicking on File > Export.
As you click on the menu, there are usually a few file types to choose from. WAV is the best format, but it may take some storage space. Meanwhile, MP3 offers a little less quality with a smaller file size. So, the decision depends on your preferences.
Once you choose the file type, decide where to save the recording and click Save. So, that is the basics of how to do a voice over. After following all steps we explained, you can import the voice over recording into your video software or send it to your video editor for further processing.
Read : Best Live Streaming Software 2023
Practice How to Do Voice Overs Today
The steps on how to do a voiceover turn out to be quite easy, aren’t they? That being said, you can start becoming a voice over artist from home by setting up a do-it-yourself studio.
What’s more, recording voiceover and editing it is not complicated. By using Audacity, you get all the basic tools to ensure great recording quality, including noise gate, clipping removal, and pitch adjustment.
So, are you excited to learn more about how to do voice overs in a better way? Stay tuned to our blog for more insights!


