


You can learn how to record gameplay on PC and start recording in the next 5 minutes, seriously.
This article will walk you through using Windows Key + G as the shortcut to Xbox Game Bar. Or how to capture your gaming session like a pro gamer using OBS Studio. So, let’s dive in!
Can You Record Gameplay on PC?
Yes, you can easily record gameplay on your Windows PC or Mac, whether you’re using a high-end gaming rig or a simpler setup.
Modern PCs come with built-in recording features. Plus, with GPU software and third-party apps, you have many options to capture such gameplay that won’t slow down your system performance.
That’s right. Did you know that NVIDIA and AMD graphics cards now feature hardware encoders? This simplifies gameplay recording with minimal system impact.
They record gameplay using dedicated graphics card parts with NVENC and AMF technology.
How about game recording software like OBS Studio or Streamlabs? They let you capture your gameplay with pro-level features whether you play FPS games or RPG games.
You can adjust bitrates, record multi-track audio, and even record and stream at the same time. This gives you total control over your content quality.
Want to record in full-screen, windowed, or on multiple monitors? You can do that. Need to record system audio and your mic for complete recording control? Why not?
Great. Now, what you need to record your gameplay on PC?
- Graphics Card — Your GPU has dedicated hardware encoders that take video encoding off your CPU. This lets you capture gameplay in real-time with minimal FPS drops. Modern encoders support H.264, HEVC/H.265, and AV1 codecs up to 8K resolution.
- Storage Drive — Recordings save as video files. Fast write speeds and enough space are needed. 1080p 60fps uses 9-18 GB/hr; 4K needs 50+ GB/hr. NVMe SSDs are best for 4K/high-bitrate. Get at least 500GB, or 1TB+ for heavy use.
- Recording Software — Apps like OBS Studio or NVIDIA ShadowPlay capture gameplay using your GPU. OBS offers advanced features like multi-track audio, while GPU software provides simple one-click recording.
- Webcam — It shows your face live, and the recording software puts it on top of your gameplay. You can get a 720p webcam if you’re on a budget, or a 1080p one if you’re a pro.
- Microphone — It captures voice commentary separately, mixed with game audio. Software adjusts gain, noise suppression, compression, and gates to remove unwanted sounds.
How to Record Gameplay on PC using Game Bar
These are some methods that you can use to record your gameplay on PC as a content creator. Xbox Game Bar on Windows 10 or 11 is ready to go right away. No download or setup needed. Here’s how to do it:


- Enable the Game Bar — Use Windows+I shortcut to go to Settings. Then, go to Gaming, and make sure the Game Bar is toggled on.
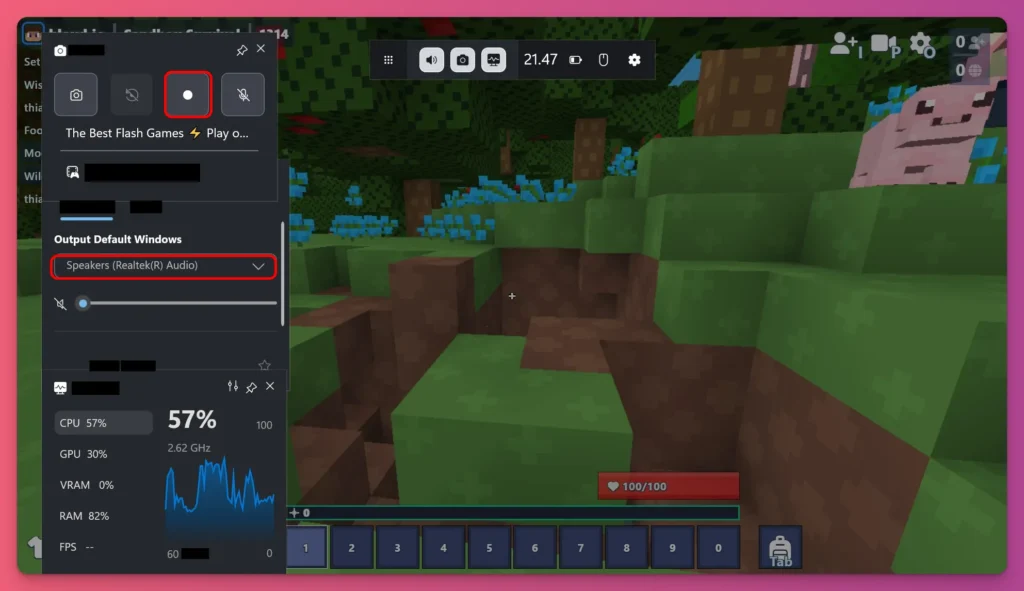
- Open Xbox Game Bar — Press Windows key + G (default) while your game is running. The overlay appears in seconds without interrupting your gameplay.
- Start recording — You’ll see the recording widget. Hit the record button, or use Windows key + Alt + R as a keyboard shortcut. And that’s it, you’re recording.
- Stop and save — When you’re done, press the stop button or use Windows key + Alt + R again. Your footage auto-saves to your Videos folder by default.
- Change save location — If your C drive is low on space, go to Settings > Gaming > Captures. Then, you can switch your save location to an external SSD or a different drive.

Game Play Recording with OBS Studio
OBS Studio is the industry standard for creators, and it’s completely free. It’s a bit of a learning curve, but worth it.
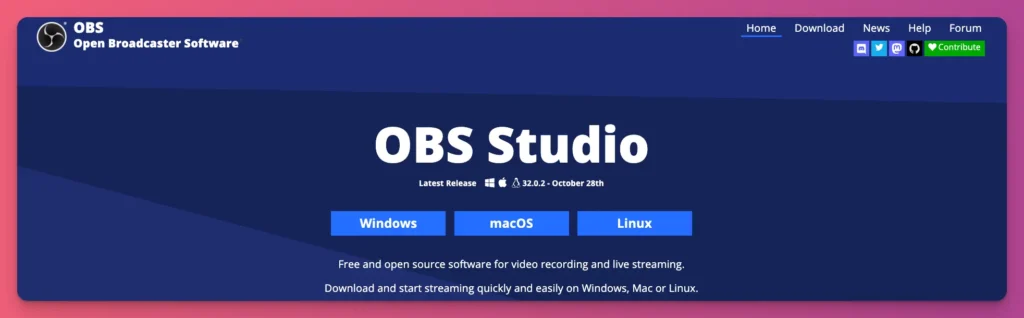
1. Download and Install OBS Studio
Go to OBS Studio official site, and grab the installer for your system: Windows, Mac, or Linux. Once downloaded, install it like you would any other app.

2. Create a New Scene
Open up OBS, and look to the left. Under Scenes, click the “+” button. Name it “Gameplay” or whatever you like. This way, you can keep your recording neat.
3. Add Your Game as a Source
Under Sources, click the “+” button and choose Game Capture. Pick your game from the dropdown menu. This is for a fullscreen game.

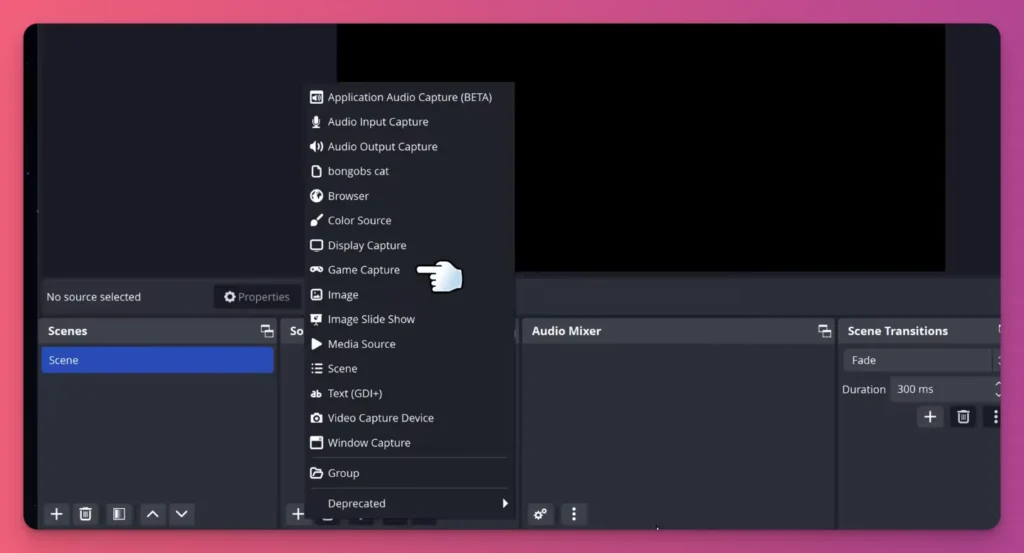
If Game Capture doesn’t work, try Window Capture instead. Then, move and resize your game on the canvas until it fills the frame.
You need to also add Video Capture Device is for your webcam. Choose your webcam like the Elgato Facecam True 4k60 from the dropdown menu. Then, position and resize your webcam feed on the canvas as needed.
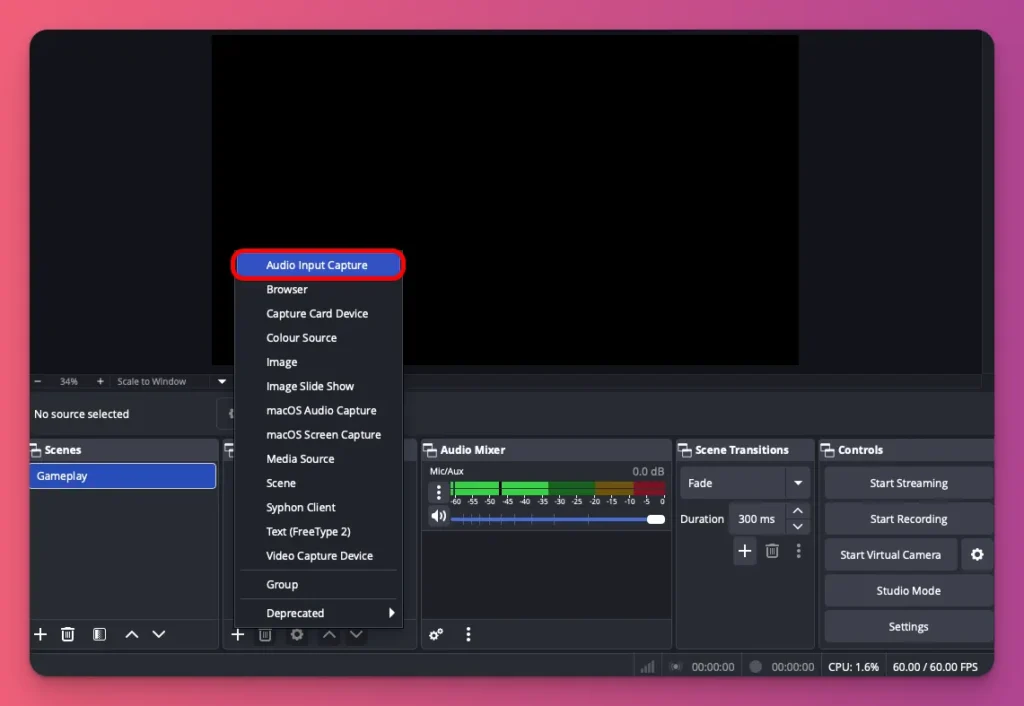
4. Add Your Microphone
Click “+” under Sources again, choose Audio Input Capture, and choose your microphone from the dropdown. This captures your voice and commentary.
5. Add System Audio
Click “+” again, choose Audio Output Capture, and choose your default audio device and also your gaming mic like the Shure MV6.

And you might need to tweak the audio mixer to get the perfect balance for what you want your viewers to hear.
6. Set Your Recording Location
You are ready with your audio video recording for your gameplay. Now. click Settings , go to Output, and set your Recording Path to an external SSD.

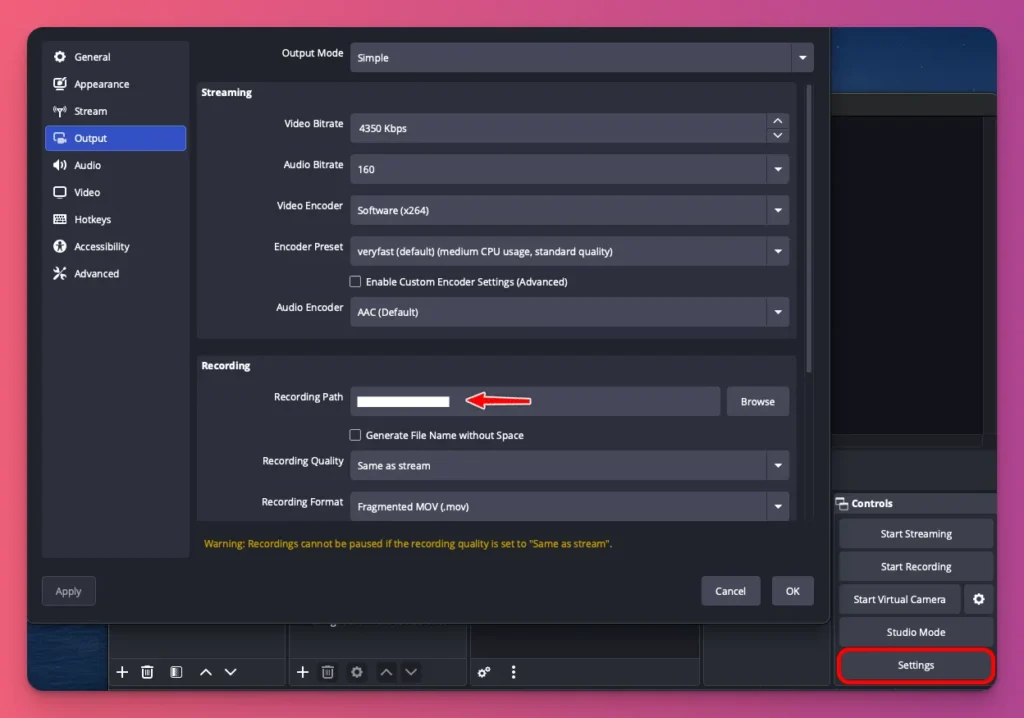
Seriously, don’t use your C drive. It’ll get overloaded if you try to game and record at the same time.
7. Choose Your Quality Settings
In Output setting, choose your recording quality: High Quality, Medium File Size for storage efficiency, or Indistinguishable Quality, Large File Size if space allows. Both options work great.
8. Choose Your Codec
Still on the Output tab, choose MP4 for recording format. For codec, choose NVIDIA NVENC (NVIDIA), AMD VCE (AMD), or Intel QSV (Intel) to offload compression to your GPU. Click Apply.
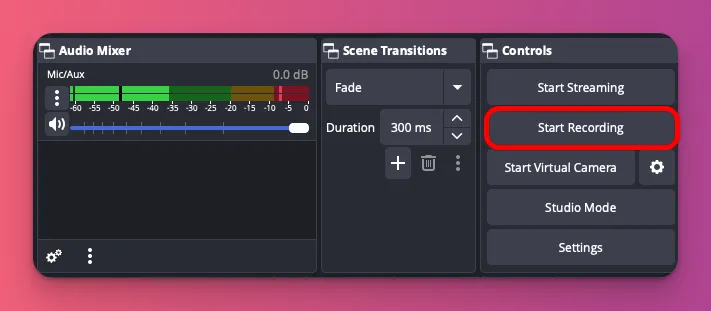
9. Start Recording
Hit the Start Recording button, play your game normally, and stop when you’re done. Your footage saves as a clean MP4 file ready for editing.

Related: How to Record Live Stream
How to Record Gameplay on Mac
Mac gaming has evolved with Apple Silicon. The M5 chip now rivals Intel’s Core i9-285K and AMD’s Ryzen 9 9950X in single-core performance, crucial for gaming.
Its GPU is often said to be comparable to an older NVIDIA RTX 3060. So, if you’re gaming on a Mac and wish to record your gameplay, here’s how:
1. Open QuickTime Player
Find QuickTime in your Applications folder or search for it using Spotlight (Command + Space). It’s pre-installed, so no download needed.
2. Start a New Screen Recording
Once QuickTime is active (you may not see any window), go to File > New Screen Recording in the top menu bar. A small recording window will appear.
3. Configure Your Audio Sources
Before recording, click the arrow next to the record button. Choose your microphone for commentary.
For system audio (in-game sound), use a third-party plugin like Blackhole. QuickTime doesn’t capture it natively.
4. Choose Recording Area
Click the red record button, then click and drag to select your game window, or just click anywhere to record the entire screen. Your game should already be running in the background.
5. Stop and Save
Once you’re done, hit the stop button up in the menu bar. QuickTime will open your recording right up, so then go to File > Save and choose where you want to keep it.
Factors Affecting Your Gameplay Recording Quality
In short, you can get your Game Bar ready, use the shortcut, and start recording. But a few things affect your recording quality, so here’s what you need to know:
- Bitrate — Think of bitrate as how much data your video uses per second. For 1080p at 60fps, try to use 12-18 Mbps. For 4K at 30fps, use at least 20 Mbps. Higher bitrates mean clearer video but larger files. A 10-minute 1080p60 video at 8 Mbps is roughly 600MB.
- Resolution and frame rate — 1080p 60fps is ideal for YouTube. It offers smooth visuals, fast loading, and smaller files. For 4K, reduce to 30fps to avoid performance issues. Most viewers prioritize engagement over pixel count.
- CPU and GPU — CPU encoding can cause a 10-20% FPS drop if you lack hardware encoding. Hardware encoding (NVENC, VCE) offloads compression to your GPU. Check your GPU in Settings.
- Audio quality — A 30-second clip with muddy audio loses viewers in seconds. In OBS, use the Noise Suppression filter on your mic input to eliminate keyboard clacks and background hum.
- System temperature — Your PC slows down when it overheats, especially during recording. Clean your case fans, add more if you record a lot, and use HWiNFO64 to monitor temps. If it hits 85°C+, your PC is struggling.
Tips to Optimize Your Settings for Smooth Gameplay
You know how to record gameplay on PC, and you already understand what affects your recording quality. Now let’s look at some tips to optimize your settings:
- Close everything except your game and recording software. Discord, Chrome, Spotify, shut them down. All those apps use CPU power that your game needs. Honestly, doing this can give you 5-15 more FPS.
- Use GPU Rendering — Whenever possible, use GPU encoding instead of CPU. In OBS, go to Settings > Output > Recording and choose your GPU’s encoder (NVIDIA NVENC, AMD VCE, or Intel QSV). If you’re using NVIDIA ShadowPlay, it’s already set up this way by default.
- Lower motion blur and particle effects in your game settings. These look cool but tank performance during recording. Dial back motion blur to zero, reduce shadow quality one notch, and cap particles at medium—your viewers won’t notice, and you’ll gain 10-20 FPS easily.
- Turn down motion blur — They look great, but they can hurt your recording performance. Turn off motion blur, lower shadow quality a bit, and set particles to medium. Your viewers won’t notice, and you’ll get 10-20 FPS more easily.
- Use an external SSD for recording — Your C drive is busy with Windows and your game. And now recording? That causes stuttering. You’d better get a $50-60 external SSD, plug it in, and tell OBS to save there. Your main drive stays free, and recordings write faster.
- Enable Game Mode — It kills background processes and boosts gaming performance with just one toggle that works. Pair this with turning off notifications. This way, Windows won’t interrupt your gameplay with pop-ups.
- Record at 60fps, not higher — Unless you’re capturing competitive esports, 60fps is the max for YouTube and most streaming. It means that if you record a video at 120fps, which is a higher frame rate than usual, you will need more storage space and processing power.
- Disable Game Bar background recording when using OBS — Windows secretly records gameplay, even with OBS active. You can turn this off in Settings > Gaming > Captures. Just switch “Record in the background” to off.
- Turn off in-game overlays — Overlays like Steam’s FPS counter, Discord’s “Now Playing,” and GeForce Experience’s instant replay indicator add rendering layers that impact GPU performance. Disabling them can boost FPS by 5-10 and prevent accidental pop-ups.
- Use replay buffer — To save storage space, use OBS’s Replay Buffer. In Settings > Output, enable it and set it to save the last 30-60 seconds. After a cool moment, hit your hotkey to save just that clip.
- Set Windows power plan to “High Performance” mode — Open Control Panel > Power Options. Select High Performance. This mode keeps your CPU at full speed, to make sure optimal recording frame rates.
Best Way to Record Gameplay on PC: A Wrap Up
You know how to record gameplay on your PC, right? The easiest way is using your OS’s built-in screen recorder. Xbox Game Bar on Windows or QuickTime on Mac.
But if you’re serious about creating gaming content, those might not cut it. As you grow, switch to OBS Studio for overlays, scene switching, and professional audio mixing.
Don’t wait for perfect gear. Record now, learn, and improve. And as your channel gains followers, you can start earning through donations, merchandise sales, and memberships, with Gank.
FAQ About Gameplay Recording on PC
Can I record my webcam and gameplay simultaneously?
Yes, you can. In OBS, add a Video Capture Device source for your webcam, resize it to a corner, and layer it over your game footage for facecam overlays. Many creators place themselves in the bottom-right corner during playthroughs, a common practice for gaming content.
Does my PC have a built-in screen recorder?
Yes, Windows 10/11’s Xbox Game Bar (Win+G) and Mac’s QuickTime (File > New Screen Recording) offer quick clips but are basic, lacking customization and limited to 1080p 60fps. It works, but it may not be suitable for serious content creation.
Why is my recorded PC gameplay lagging?
You’re likely using CPU encoding, running too many background apps, or recording to a slow drive. Check OBS Settings > Output and make sure your GPU’s encoder is selected. Close unnecessary apps like Discord and Chrome. Consider moving recordings to an external SSD.
Can budget laptops record gameplay smoothly?
Your GPU affects recording quality. Integrated graphics like Intel Iris can do 1080p 30fps on easy game settings, but might need lower resolution or frame rate. Laptops under $200 struggle with smooth 1080p 60fps.


