


You’ve learned about streaming software from our previous article. Most of those tools not only allow you to stream in real time but also let you record it. That way, you can use it as video-on-demand content and monetize it. But, how to record a live stream?
That’s what we’re about to discuss in this article. Recording a live stream is actually easier than you might imagine. You even have many options to do it, from using the built-in tools from your PC or Mac to utilizing third-party applications or platforms.
Getting more curious? Let’s dive right into the complete guide on how to record live streams. We’ll break it down step by step.
How To Record Live Streaming Video
There are three ways in terms of how to record a live stream. You can use built-in tools on your computer, record live streaming with streaming software and tap a streaming platform. Let’s start with the easiest one:
1. Recording a Live Stream using Built-in Tools
Can you record a live stream only using a built-in tool from your computer? Sure, both Windows and Mac got you covered with nice screen recording features, accessible with a simple shortcut.
On MacOS
Mac has a great screenshot app to make recording a live stream a breeze. Check out these steps on how to capture streaming video on Mac:


- Make sure you’re running macOS 10.14 (Mojave) or a newer version. Go to About This Mac and then the Overview tab to see your macOS version.
- Press Command+Space and type Screenshot. Or, simply use the shortcut Shift+Command+5.
- You’ll see a highlighted area on your screen with a control bar below it. Choose either Record Entire Screen or Record Selected Portion.
- Go to Options to set where you will store the recording, the mic you are using, and some other settings as a step in how to record a live stream.
- Press the Record button to start recording based on your preferences. That’s how to make a recording while you’re streaming.
- When you’re ready to stop recording, simply click on the Stop button up there on the menu bar.
- Your recording will be saved based on your preferred location. By default, it will be on your desktop.
Those are the easiest steps on how to record a live stream using Mac. Alternatively, you can use the QuickTime Player app. Simply open the QuickTime app, go to File, and select New Screen Recording.
On Windows
How to record a live stream on a PC? As a streamer, you can follow these simple steps if you’re running Windows 10 or Windows 11:
- Make sure Game Bar is enabled. You can go to Settings (use the shortcut Windows+I), select the Gaming category, and check if Game Bar is switched On.
- When you’re ready to start recording, open the application you want to capture and press Windows+Alt+R. Alternatively, you can use Windows+G to open the Game Bar and click the Record icon.
- You’ll see a notification indicating that the recording is in progress. If you want to adjust any settings for the current recording, there are options available.
- When you’re finished and want to stop the recording, simply hit Windows+Alt+R again.
- Your recordings will be automatically saved. By default, they’ll be stored in the Video folder within File Explorer.
That’s how to record a live stream on a PC using the built-in screen recording tool. Now, what if you want to use other apps for recording?
2. Recording Live Stream with Streaming Software
The first step in how to record live stream is picking the right screen recorders or streaming apps to use. Some of them are:
- Streamlabs OBS —Popular live streaming and recording software supports Windows, macOS, and Linux.
- Ecamm — Fremium software for screen recording, made especially for macOS.
- vMix — Fremium live streaming and recording software, made especially for Windows.
- Snagit — Premium video editing and screen recording software for Windows and macOS.
- Screencastify — One of the great freemium Chrome extensions for recording live stream
- Movavi Screen Recorder — An easy-to-use tool for video capturing
Then, you can continue the live stream recording steps. Here, we use StreamLabs OBS as the example:
- Start by downloading and installing the StreamLabs app. Once that’s done, open the app to begin recording a live stream.
- If you’re using a platform like Twitch, you can choose the Recording Only option in StreamLabs. This allows StreamLabs to function solely as a screen recorder. However, if you plan to stream and record simultaneously, select the Livestreaming option from the get-go.
- You’ll see live streaming platforms available to choose from. Pick the one you prefer or click Skip if you only want to record.
- Before you start recording, make sure your microphone and webcam for streaming are properly set up. This is important to avoid any issues with your recording. While there may be skip options available, double-check your device settings to ensure everything is in order.
- The next step on how to record live stream using StreamLabs is choosing the source for the recording. A common source to use is the screen capture. You can go to All tab, select Screen Capture, then Add Source.
- Choose the screen or window you want to record, and click Done.
- On the main editor page, make sure that the webcam and screen, and sound are captured properly.
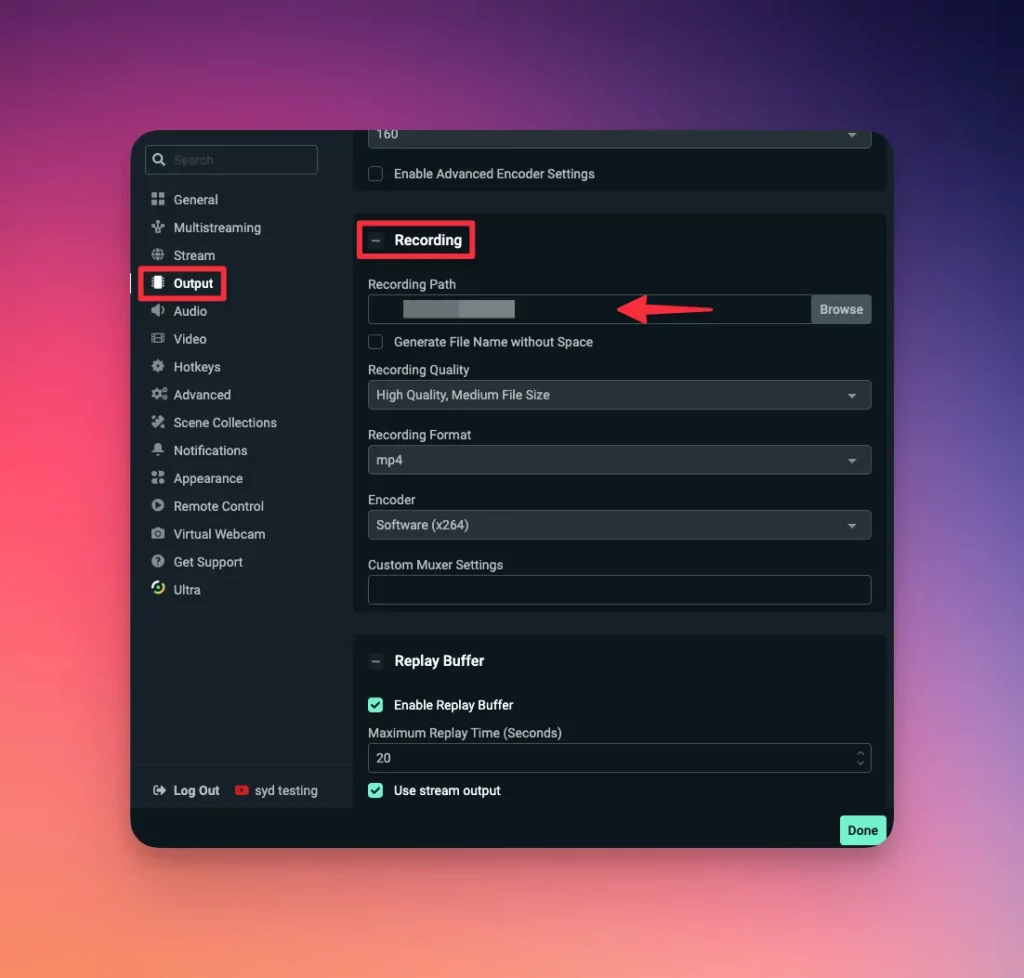
- Before clicking the record button, it is recommended to check the output settings. To do that, Go to Settings > Recording. On the output folder, specify the correct destination of the recorded video. Make sure you choose the right bitrate for streaming, too. Also, make sure you’re choosing the proper recording format, the default is mp4 but you can choose .mov, .flv, and many more.
- If everything is well set up, click Record.
- If you want to end the recording, simply click Record again.

Those are steps on how to record a live stream on a PC if you’re using third-party software.
Remember that apps like StreamLabs may have limitations for free use. The limitation for recording a live stream can be on the duration, or the watermark pinned on the recording outputs.
Read More: StreamLabs vs OBS Studio
3. Using Dedicated Streaming Service
Using a live streaming platform can be a smart move because they often offer a comprehensive solution for all your streaming needs. Those platforms usually come with built-in recording features, making them super convenient.
One such platform is StreamYard which you can use for free and allow you to record livestream for two hours per month. Let’s walk through how to record a live stream using StreamYard:
- Start by creating a free account on StreamYard using your email.
- Once you’re logged in with your email, you’ll land on the main page of the StreamYard platform.
- Click on the Broadcast menu and create a live stream using StreamYard. Choose the Studio as the source for your live stream, or you can use pre-recorded videos if you prefer.
- Add your desired destination platform where you want to stream. StreamYard offers options like Facebook Live, Twitter, YouTube, and more.
- Give your live stream a catchy title and hit Create Broadcast.
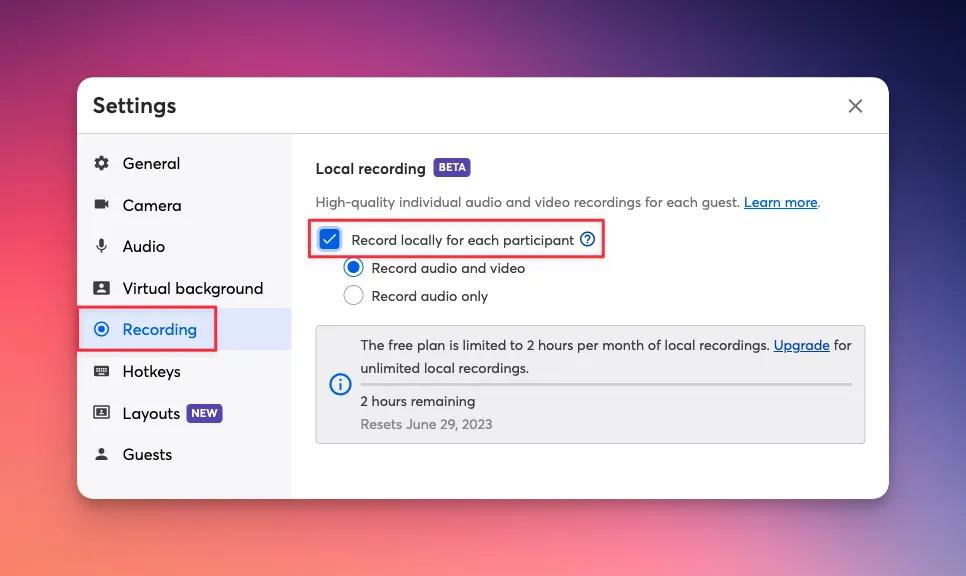
- You’ll be taken to the StreamYard studio page. From there, go to Settings and select Recording. Make sure the option Record Locally for Each Participant is checked as well as the Record audio and video radio button.
- Once you’re successfully connected to your desired platform, simply click on the Record button to start recording a live stream.
- After you finish recording, the file will undergo an upload process.
- Once the upload is complete, you’ll have the option to View Recordings. From there, you can download or export the recorded livestream as needed.

Is there a way to record live-streaming video? Yes, there is and Streamyard is one of the best platforms to do that easily.
Related:
How to Record Live Stream: Final Thoughts on These 6 Easy Steps
So, before, you were wondering: “Is there a way to record live streaming video
?” Well, guess what? You’ve found out there are actually a bunch of ways to make it happen.
In this article, you’ve learned different methods for recording a live stream. You can use built-in software from Windows and Mac, go with streaming software like StreamLabs OBS, or even use an all-in-one streaming platform like StreamYard.
Regardless of which method you choose, here are the general 6 steps we covered for recording a live stream:
- Make sure you can access or open the screen recording tool or platform properly.
- Go to the Settings page to make sure you use the right devices like webcam and microphone.
- Double-check that your output folder is set to your preference.
- Start recording a live stream with any tools you use.
- Go through the post-recording process.
- You’re all set with your recorded live stream.
No matter which method you go with, following all the steps correctly is important. Make sure there are no settings that don’t match your devices’ specifications. If you run into any issues along the way, don’t fret. Just go through each of these steps.
After that, you can take your recorded live stream and give it a new life by repurposing it for different platforms. This will help increase its visibility and reach a wider audience. You can also turn it into on-demand video content, which can be a great opportunity to monetize your content.
You’ve got the lowdown on how to record a live stream. So, what are you waiting for? Go ahead and connect with your online audience!


