


Viral videos like Bella Poarch’s “M to the B” can make video editing tips for polished content seem pointless. And you start to believe that posting raw content is the way to go.
But just because a video looks rough doesn’t mean it wasn’t edited. Sometimes, it’s on purpose to look that way.
So, let’s talk about why editing still matters and how to make a good edit so your content stands out and catches the algorithm’s attention.
Key Takeaways
- Editing is part of the content, not an add‑on. Even great ideas can fall flat if the pacing, clarity, or structure are off.
- Retention beats “raw” aesthetics. Simple cuts, quick intros, and basic edits like B-roll, captions, and fixing the audio always do better than long, unedited talking heads.
- Audio and readability matter more than looks. Clear sound, proper volume, and captions for vertical videos are more important than fancy transitions or effects.
- Edit with purpose, not just for noise. Every clip, cut, zoom, SFX, and B-roll should have a reason.
Do You Really Need Video Editing?
The short answer is yes, and here’s why you need to do that as a content creator:
1. Raw Video Isn’t Automatically Better
Don’t buy into the idea that raw videos are instantly better. “But, they go viral..” Sure, but that happens despite the lack of editing, not because of it.
Keep in mind that the algorithm focuses more on signals like retention and completion rates. If you can’t grab your audience fast, just being “authentic” won’t cut it.
And honestly, even “raw” videos usually involve planning. Bella Poarch notes: “I incorporated the Face Zoom filter and it took me more than a hundred drafts to make it really perfect“
2. You Can Edit More Efficiently
The real question isn’t if you should edit, but how to do it fast. You just want a quick touch-up, not a huge hassle, right?
Most small YouTubers spend 10-20 hours editing 10-15 minute videos. That can burn you out, especially when you’re just starting out.
Luckily, platforms like YouTube and TikTok have built-in editing tools. You can add sound, text, voiceovers, use a timeline, and filters, making editing way easier than just uploading raw footage.
3. You Need It to Enhance Authenticity
Editing doesn’t kill your authenticity. It actually makes it clearer. People want to know your story, without awkward pauses, messy audio, or long intros.
On TikTok and Reels, that “effortlessly raw” look is on purpose. Some creators use quick cuts, native text, and smooth transitions to seem relaxed but still polished behind the scenes.
Many creators skip flashy effects if they don’t fit their audiences, but still prioritize clear pacing and clarity.
4. Editing is Content Quality
You might think, “My ideas are what matter, so I’ll just learn editing later when I have an audience.”
This mindset makes it seem like content and editing are separate. They’re not. Editing is not an add-on to your content, it is part of the content itself
And even with the best ideas in your niche, slow pacing, bad audio, or confusing starts can make viewers leave early. That makes the algorithm see your video as low quality.
5. Go For Optimal Performance
If a TikTok hits 500 views, it is natural to wonder whether to leave it alone or edit future videos to get more engagement.
These views show people are interested, but your content could do so much more. The real question is, how much more could your video reach with a smoother flow?
And tools like TikTok’s split test or YouTube’s Test & Compare help creators go beyond “good enough.”
6. Free Tools Are Enough to Start
Want to edit your videos with Adobe Premiere Pro? That’s great. But don’t fall into the trap of thinking that it’s a standard. Video editing doesn’t have to be expensive.
The fact is, many of the most engaging TikToks are filmed and edited within the app. They include tutorials, daily vlogs, and viral content.
If you want other options, video editing software like CapCut and DaVinci Resolve are free and work great. They can help you make awesome videos without paying a thing.
7. You Need It in Every Niche
For tutorials, polished edits are a must, but in gaming or vlogs, audiences want to see the full session without cuts to keep it real. It that true?
Yes, but that’s not the whole story. Even if it’s about being natural, you can’t always make your vlog look totally unedited like Sam Sulek. If you don’t do it right, it’ll seem amateurish, not real.
Different niches need different levels of editing, not none at all. You just need to know the right video editing tips and tricks to use.
- Educational creators should focus on clear audio, text callouts, and simple screen recordings
- Gaming creators highlight quick moments, clutch plays, funny reactions, or key story parts rather than editing
- Vloggers often use jump cuts and light music
Purposeful editing makes your vibe stand out so people stay engaged. Doing it right makes everything clearer, and helps you make money.
15 Best Video Editing Tips for Beginners
Let’s check out the best video editing tips for beginners that you can use for your content in 2026:
1. Start With a Clear Objective
- Category: Planning
You need to decide what you want your edit to do. The same footage can be changed in different ways depending on your goal.
So, a 2-hour session of Valorant can become:
- a clutch montage—enemy down to 1 HP, you’re last alive, making the impossible play
- a funny moments reel—failed strategies, voice chat chaos, silly positioning
- a skill tutorial—how to hold this angle, why I choose this crosshair placement
Each gets its own style. For gaming videos building suspense, use slower pacing to hold tension. For teaching, use clear sound and pictures, and give people enough time to understand.
- Write one sentence like, “After watching, viewers should click my link and watch my exclusive content.”
- Know what the video is for. Is it to teach, entertain, get people to act, or show off a skill?
- You also need to know your audience. Before you edit, think about who’s watching and why.
2. Plan the Story
- Category: Planning
Are you sure you want to start your video editing without a plan? Many creators just drag random clips onto the timeline, watch them, and shuffle them around.
This lack of clip organization often happens because you’re unsure of the order or your core message.
That’s why storyboarding your narrative is one of the most important video editing techniques. This will help ensure a smooth transition from raw assets to the final export.
- Plan your video with clear beats to tell a focused story.
- Break down your idea into specific moments, like “insane clutch” or “teammate troll” for gaming content
- Mark shots during review to avoid rewatching all your footage.
- Open your editor and follow your plan, not your instincts.

3. No Filler Content
- Category: Planning
A major mistake in keeping viewers engaged is failing to remove “filler” content. The fix? Make sure every clip is valuable. Yes, and this is one of the most underrated video editing tips.
If a clip doesn’t move the narrative forward, add emotional depth, or provide clarity, it acts as “noise” that disrupts the viewer’s experience.
So, if a clip doesn’t move the story or add emotion or clarity, cut it. That’s how to make a video on YouTube, TikTok and Instagram.
Most creators see editing as adding transitions, effects, or music. But true power is in subtraction. Every second that doesn’t move the story or emotion forward risks losing the viewer.
- Carefully review your raw footage and mark any moments that lack story, emotion, or value.
- Ask yourself: “Does this clip make someone laugh, learn, feel tension, or want to see what happens next?”
- Play it back. If it feels slow or dull to you, it will feel the same to viewers.
4. Hook in the First Few Seconds
- Category: Structure
You’ve got a real challenge as a video creator, 50–60% of viewers drop off within the first three seconds on TikTok, Reels, and YouTube Shorts. That’s where your editing makes or breaks the video.
So, if half your audience leaves before anything cool happens, the algorithm sees that and thinks your content isn’t worth showing to more people.
That’s why landing the hook in the first second is how to make a good edit for your short-form content. And this also works for regular YouTube videos.
For example, start a gaming video with a clip of dancing after a win, then say that you know the secret. Viewers will stay engaged.
- Find that one moment that makes people stop, like a punchline, shock, or payoff.
- Start your story right there and skip everything that came before. No need for background info.
- Make sure your message matches that opening so viewers get it fast.
- Add a quick text overlay or sound cue in the first second to hook people visually.
5. Front-Load Value Before Context
- Category: Structure
You want your content to flow smoothly by starting with the story, problem, or background, and saving the best part for later.
It feels right, like building suspense. But you’ve buried your best part 25 seconds in, killing your completion rate. That’s why, always front-load value before context.
Check out how Mr Beast start with: “Take of your blindfold. I trapped these 100 people inside the world’s largest trap. Lower the ceiling.. “
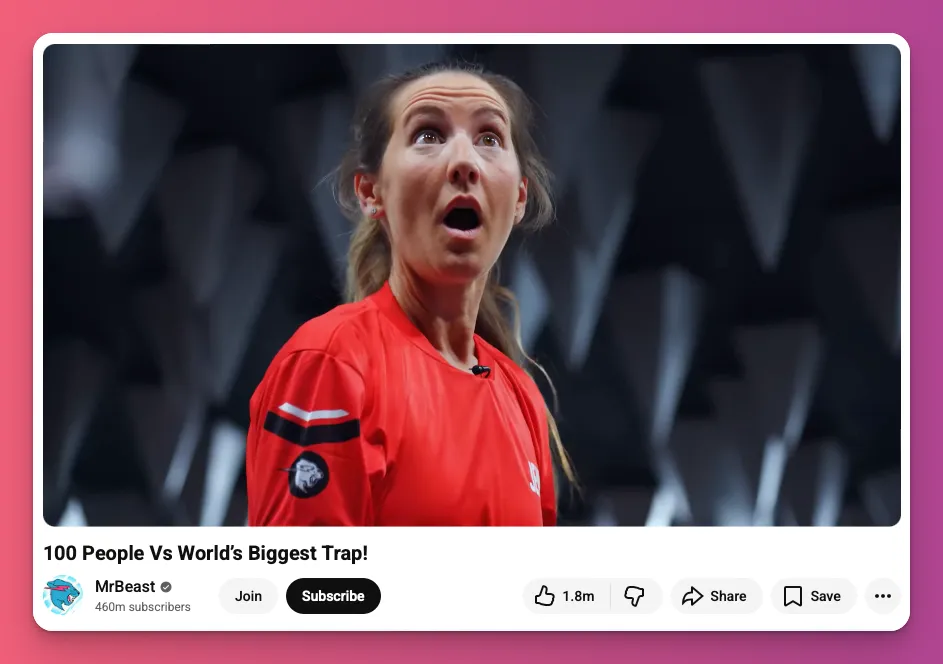
And then the video shows you what the participants went through. That’s what I wanted to get across, and these can be your next video editing tips.
- Start your timeline with your best moment. For example, in a vlog, say, “This trip was supposed to be a chill solo weekend, then this happened.”
- Follow with a quick explanation via voiceover or B-roll to add context without slowing the story.
- Capture attention in the first 20–30 seconds. Show the final costume or transformation right away in a cosplay video.
6. Use 3–5 Second Pattern Interrupts
- Category: Pacing
Your brain is wired to notice change, so if you want people to stick around longer, your content needs those pattern breaks to grab their attention.
When a shot stays still too long, viewers unconsciously feel bored. On TikTok and Reels, this boredom leads to swipes. This can drop your completion rate.
That’s why our editing tips recommend pattern interrupts. That’s a small visual or sound changes every few seconds, like a quick zoom, B-roll, animated text, or camera angle shift.
- Map out your edit, marking every 3–5 seconds for visual or audio changes.
- Add in B-roll, text overlays, or quick zooms at those points.
- Watch the timing—if any gap is longer than 5–6 seconds of still footage, add a change.
- Play it muted; if the visuals alone keep interest, your pattern interrupts are working.
7. Use Subtle Speed Tweaks
- Category: Pacing
For this video editing tip, the idea is simple: speed up for unimportant sections and slow down for critical moments. That keeps viewers interested without feeling rushed.
Some parts, like explanations or transitions, tend to move slower naturally. Speeding them up by 5 to 10 percent keeps things flowing smoothly without cutting the footage.
The trick is knowing which parts need space and which are just filler. Speed tweaks work well for technical explanations, walking scenes, or B-roll, but kill the vibe on emotional moments, or jokes.
- Pick those clips and bump their speed up a bit, like 1.05x to 1.10. On Premiere Pro, tick “Maintain Audio Pitch.
- Keep emotional parts, jokes, and key moments at normal speed so they hit right.
- Watch the whole thing at normal speed to make sure it doesn’t feel rushed, and don’t go overboard with these video editing techniques.
8. Cut on Action to Hide Edits
- Category: Transition
Cutting on action is when you cut during movement. It makes transitions smoother, keeps the scene flowing, and makes scene changes feel natural.
This is one of underated video editing tips that will work for content like gaming POV, walking vlogs and cooking tutorials.
Let’s say you’re playing Fortnite, running toward a supply drop. Instead of stopping, cut while still moving—mid-run, mid-aim, mid-reload. The viewer’s eye follows the movement, hiding the switch.
- Watch your raw footage and mark where your subject moves: gestures, turning, walking, reaching.
- Place your cut in the middle of the action, not before or after.
- Cutting during movement maintains energy and pace, keeping viewers engaged.
- Match audio and sound effects with the action cut for seamlessness.
9. Prioritize Audio Quality Over Image Quality
- Category: Audio
If you think video editing is just about footage, think again. People don’t mind some visual mistakes. But bad audio? That’s a total turn-off. It’s one of the toughest challenges for video creators.
Sound is over half of what people notice. A phone clip with clear sound keeps viewers longer than a 4K video with bad audio.
This is one of the most overlooked editing priorities. People don’t notice good audio, but bad audio instantly stands out. Poor sound makes your content seem cheap and unprofessional.
- Start with the audio first, then add the video layer on top.
- Use the right gear and set levels carefully for the best audio. But soundproofing is also key.
- On Instagram and TikTok, set your audio bitrates around 128 kbps for mono and over 192 kbps for stereo.
- On your editing timeline, clean up background noise and balance sound levels.
10. Keep Dialogue Peaks Below −3 dB
- Category: Audio
Clipping happens when your audio hits 0 dB, sounding distorted, harsh, or broken. If you’ve never seen this in video editing tips, you need to pay attention to this.
When your voice or game audio hits the limit, the waveform gets cut off, causing crackles and pops. Once it clips in your export, it can’t be fixed.
For Let’s Plays, tutorials, or montages, keep your voice between -6 and -3 dB. Pro editors in Premiere aim for this. It sounds good on all devices.
- Monitor the audio meters and aim for dialogue peaks between -6 and -3 dB.
- Use a limiter at −2 to −3 dB true peak to prevent spikes.
- Keep music 15-20 dB quieter than voice to support without competing.
- Normalise voice to −10 dB before processing for headroom.
11. Use Sound Effects as “Micro Hooks”
- Category: Audio
Do you love using sound effects in your videos? They’re great for highlighting big moments, but don’t use them for every transition.
Think of whooshes, hits, and risers as tiny cues. Small sounds that grab attention and signal something important just happened.
When a big moment happens or a surprise comes out, the right sound can make it hit harder and stay with people.
- Think about why you’re using a sound. Is it to show movement, set a mood, or make a joke stand out? If not, it’s probably just noise.
- Those sound effects need to hit the right moment, be the right sound, and at the right level.
- Not everyone likes it. Overusing effects, especially loud whooshes, can cause viewers to click away.
12. Use B-Roll Strategically
- Category: Visuals
Why do viewers tune out so fast? Because all they see is a static talking head. It gets boring quick. No matter how good your tips are, people want movement and variety.
On YouTube and TikTok, visual fatigue hits hardest. People scroll away as soon as they lose interest. So, it’s not just what you say, but how you show it in your content. You need B-Roll.
For example, gaming content creators can use B-roll to show gameplay clips alongside their talking head. Instead of just describing a clutch, you can show the gameplay while explaining.
- Cover about a third to half of your video with relevant B-roll, not filler.
- Match B-roll to your words
- Cut away from your face every 10-15 seconds during long explanations.
- Use gameplay, screen recordings, diagrams, or text overlays for gaming and tutorials.
13. Avoid Overdoing Digital Zooms
- Category: Framing
Digital zooms are when you blow up your footage in post-production to create a punch-in effect. But if you overdo it, it can look amateurish.
Honestly, it’s not the zoom itself, but using it to create energy instead of letting the content do the work. But, when everything’s always zoomed in, nothing feels special anymore, right?
Good editing is about knowing when to hold back. A single, well-timed zoom at the right moment hits harder because it stands out from the rest.
- Time your zooms with your script’s pauses or inflections, not randomly.
- Use zooms for punchlines, reveals, or dramatic moments.
- Keep 2-3 zooms per minute for fast content, fewer for slower.
- Use subtle zooms (105-115%) for professionalism, bigger (150%+) for comedy.
14. Add Burned-In Captions for All Vertical Content
- Category: Text
Did you know 69% of people watch videos with the sound off in public, and 25% do even when alone? Without captions, your message is gone.
Burned-in captions put the text right in the video, so your main point gets through with or without sound. And adding captions to videos boosts understanding by 56%.
Captioned videos keep you watching longer by combining text and visuals, making it easier to stay engaged.
- Add captions to all vertical content in the first 3 seconds so silent scrollers catch on right away.
- Use big, bold fonts with strong contrast like white text with a black outline.
- Match the text timing to speech exactly, breaking lines into 1-2 second chunks.
- Put captions low on the screen and stay thumb-friendly on phones.
15. Do Simple Colour Correction Before Creative Grading
- Category: Colour
Colour correction and grading are two different things in your edit. Colour correction fixes problems like white balance, exposure, and mismatched shots that mess up the flow.
Creative grading is about adding a look after shooting, like warm for nostalgia, cool for tension, or grey for drama. But you can’t grade well over footage that’s broken.
Doing colour correction first makes sure all shots match in exposure and white balance. Then, your grades stay consistent, and you save time by fixing issues early.
- Start by picking a neutral shot and fixing its white balance, exposure, and contrast first.
- Match every other shot in your timeline to that reference using colour correction tools, not creative grades.
- Only after every shot matches and looks good technically, should you add your creative grade across the whole timeline for a consistent style.
Related: How to Make ASMR Video Content
Video Editing Tips and Tricks: A Wrap-Up
You came here wondering if editing mattered. You’re leaving with 15 video editing tips for YouTube, TikTok, and Instagram. While there are more to explore, these 15 are enough for beginners to start.
Use the right video editing techniques to attract views and followers. And as you grow, you can think about making money with ads, sponsored posts, or Super Thanks.
Or you can check out Gank, a membership platform that helps turn your audience into income with donations, exclusive content, or merch sales. Ready to get started?
FAQs on Video Editing Tips
What are the 3-2-1 rules of video editing?
There are two “3-2-1” rules. First, for safety: keep 3 copies of your project, on 2 different storage types, with 1 copy offsite.
Second, for content: use 3 different camera angles (wide, medium, close-up), 2 different shot types (e.g., establishing, reaction), and 1 cutaway shot to keep viewers engaged.
What are common editing mistakes?
Most creators fail for five reasons: editing too much (style over substance), using YouTube pacing on TikTok (platform mismatch), ignoring audio quality (bad sound loses viewers faster than bad video), having no pacing strategy, and posting without checking analytics to see where viewers drop off.
Can I self-learn video editing?
Yes, but focus on principles, not just software buttons. Learn pacing, audio-visual sync (J-cuts), B-roll timing, and platform retention hooks. Spend weeks 1-2 on software basics, weeks 3-8 on editing and analytics, and weeks 9-12 applying one new principle per video.
What is the most common editing technique?
The J-cut. The audio begins 0.5 to 2 seconds before the video cuts to the new scene. This “audio bridge” pre-hooks the brain, making transitions feel seamless. It works for TikTok hooks, YouTube storytelling, and prevents the “abrupt” feeling of amateur edits.


