


So, how to clip on Twitch? First, make sure the clipping feature is enabled. Then, click the clapperboard icon to create a clip. Sounds easy, right? But there’s more to it than that.
This article breaks down how to turn simple clips into promo gold. We’ll cover everything, from the different workflows on desktop versus the mobile app to how to clip as a streamer or viewer.
So let’s get started.
What is a Clip on Twitch and Who Can Use That?
A Twitch clip is a built-in feature that lets you and your viewers make short, shareable videos of awesome moments from your streams.
These clips usually last between 5 and 60 seconds, making them perfect for showing off memorable highlights from your Subathon.
Clips as a native Twitch feature launched around 2016. Before that, Twitch offered a different feature called “highlights,” which were limited to 15 minutes.
And even before Twitch added clips, people used third-party apps like Oddshot to grab and share their best moments.
You can trim and crop clips to highlight the absolute best parts. Both streamers and viewers can create and share clips, helping build a stronger community around your channel.
And when you publish a clip, it’s a simple process to get it ready to share on TikTok, Instagram Reels, or YouTube Shorts.
What’s more, Twitch has a Clip Manager that keeps all your clips in one place, so you can quickly edit and share them whenever you want.
Plus, Twitch’s mobile layout makes sure your clips look great whether you’re on a phone or tablet, with formats optimized for both portrait and landscape viewing.
Related: What is Clip Farming
How to Clip on Twitch as a Streamer on Desktop
Creating clips from your previous broadcasts gives you full control over which moments get highlighted. Here’s how to turn your VODs into shareable content after your streaming sessions:
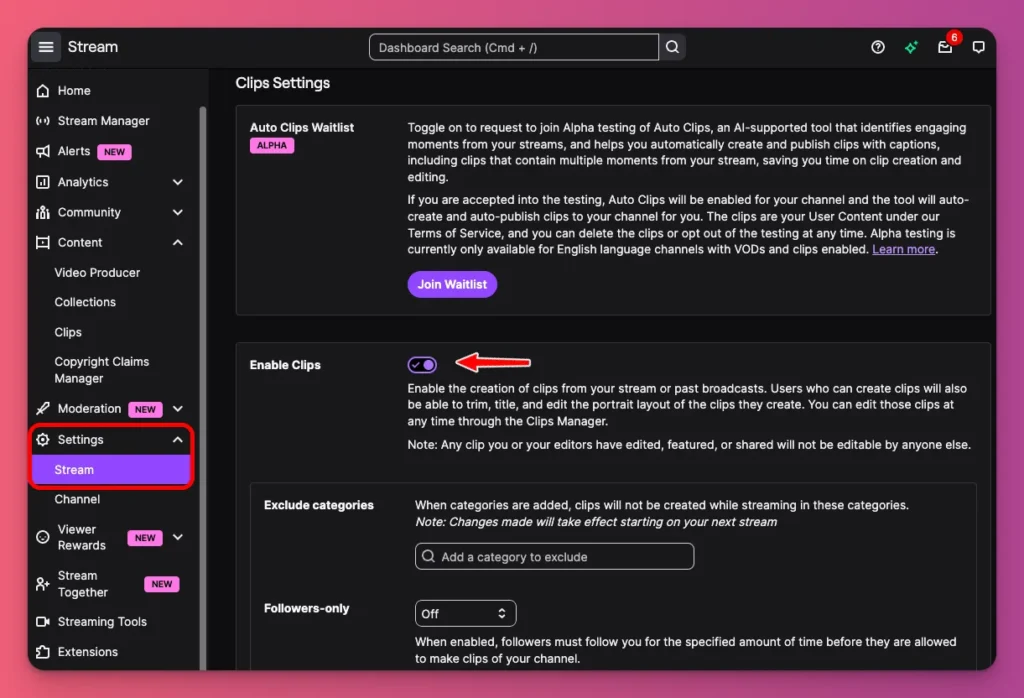
1. Check Your Clip Feature
Before you start with all the steps to clip on Twitch, you need to make sure that the Clip feature is on. Go to Creator Dashboard, click Settings, Stream and look for Enable Clips. Make sure it is toggle on.
2. Go to Your Channel
Once you finish your stream session, all your content gets saved as a VOD (Video on Demand) on your channel. Click on your profile icon and choose Channel to access your past broadcasts.
3. Choose Your Video
Go to the Videos menu to see all your available VODs. You can choose your most recent broadcast or scroll through older streams to find the content you want to clip.
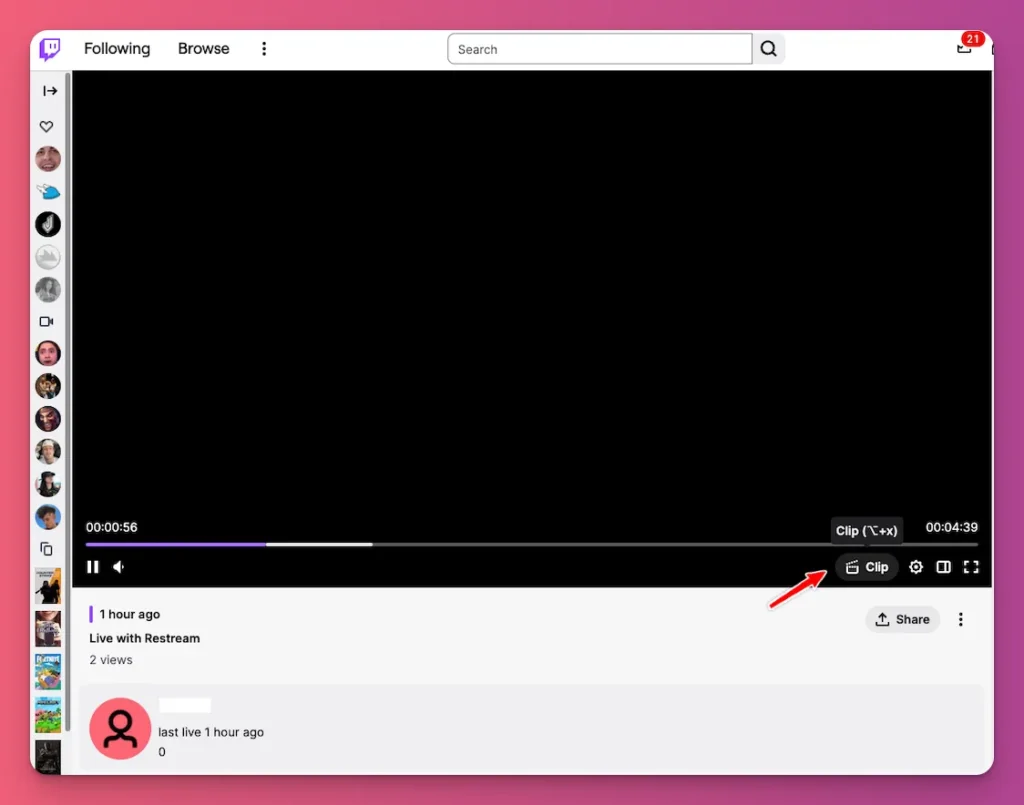
4. Click the Clip Button
Once you’ve found the segment you want to clip, click the clapperboard icon in the bottom-right corner of the video player. This opens the Clip Creator overlay.
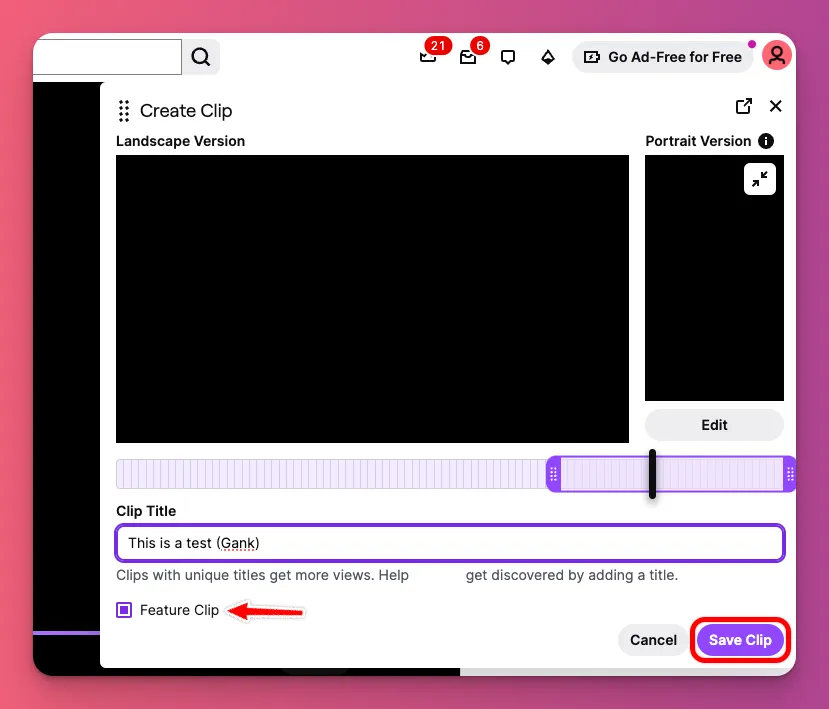
5. Trim Your Clip
The clip editor shows you both landscape and portrait versions of your clip automatically. Use the slider to trim it down to your perfect 1-to-60-second segment.
6. Add a Title and Save
Give your clip a catchy, clear title so people can find it later. You can also set it as a Featured Clip to boost its visibility. Then just hit Save Clip to add it to your Clip Manager.
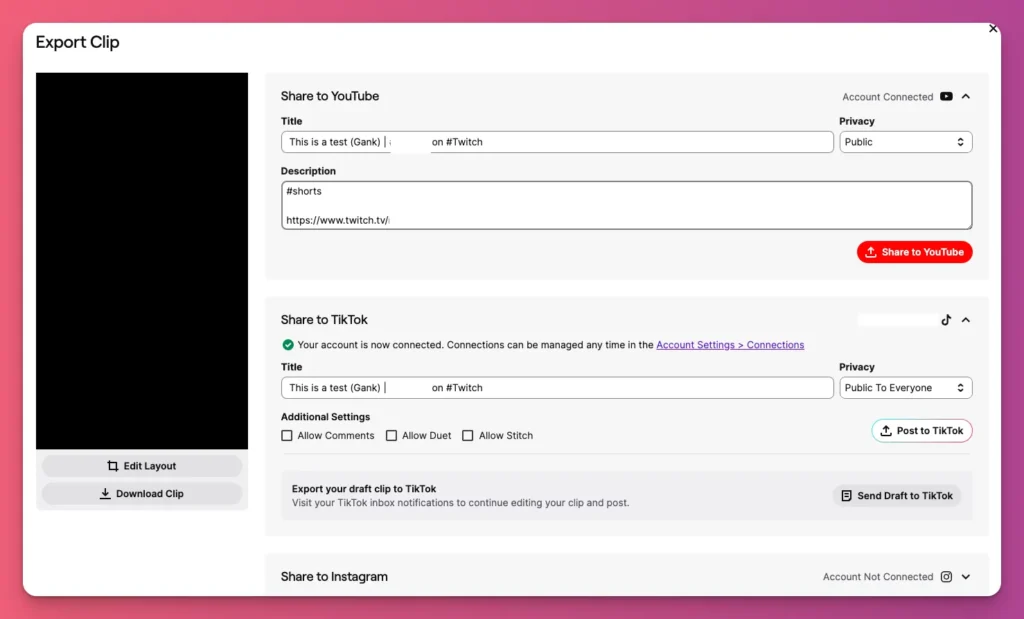
7. Share to Social Media
After you save it, you can download the clip and upload it to your social media, or just share it instantly to YouTube Shorts, TikTok, or Instagram Reels right from Twitch.
Make sure your accounts are connected first, and add some catchy descriptions with relevant hashtags to maximize reach.
How to Create a Clip as a Viewer on Desktop
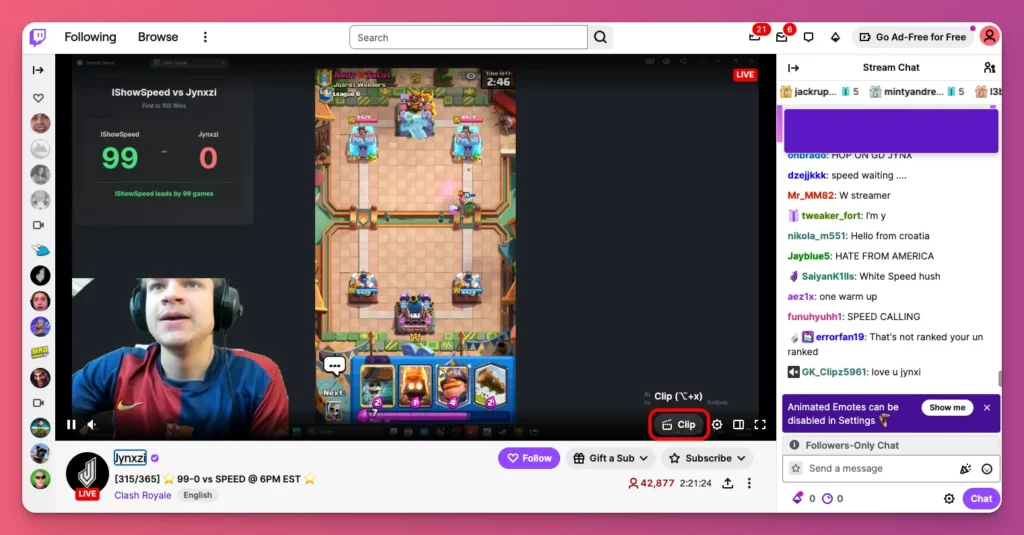
The clip creation process uses the same clapperboard icon, but as a viewer, you get to capture exciting moments as they happen live during someone else’s stream like from Jynxzi below:
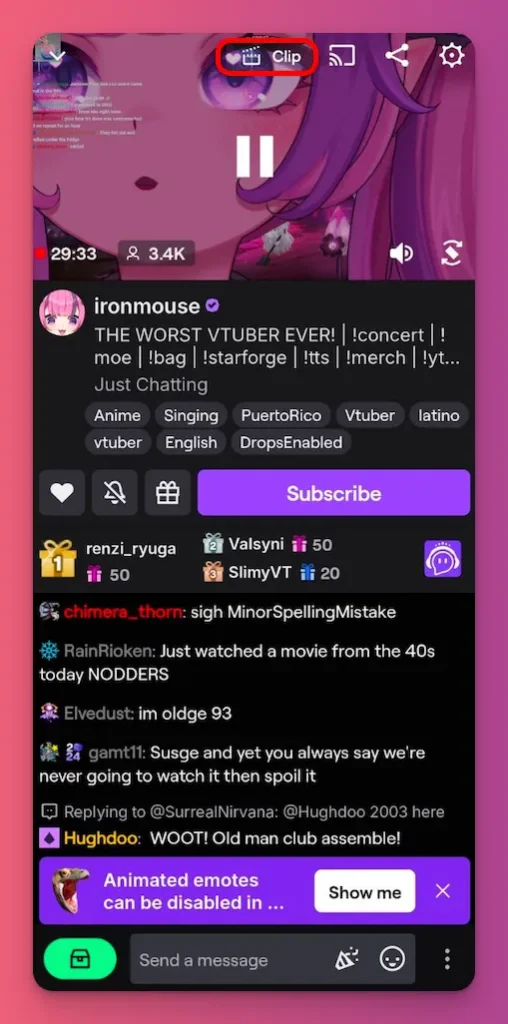
1. Find the Clip Button
While you’re watching a live stream, look for the clapperboard icon in the bottom-right corner of the video player. You can also use the keyboard shortcut Alt + X (Windows) or Option + X (Mac) to speed things up.
2. Open the Clip Editor
Clicking the button opens the clip editor in a new tab right away. It grabs the last 90 seconds of your stream, so you have plenty of footage to work with.
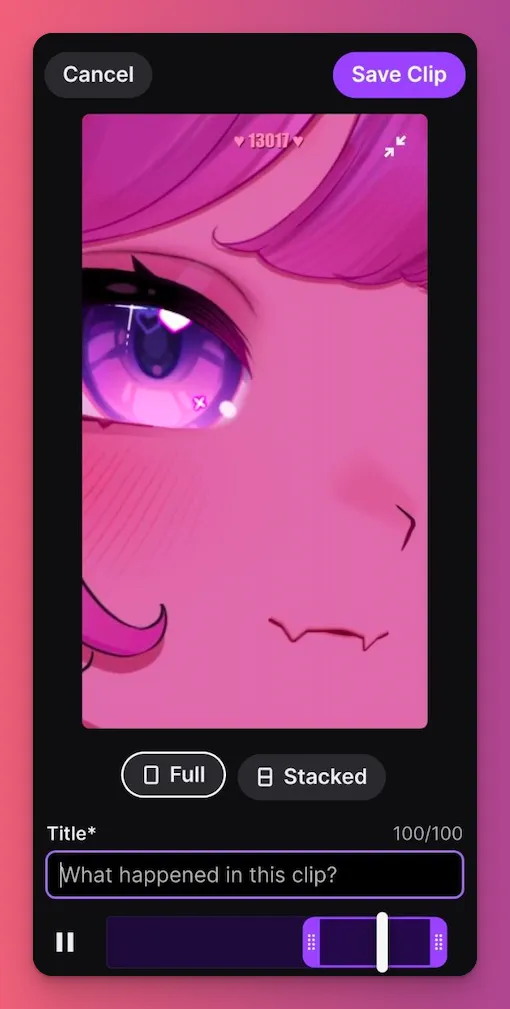
You’ll see the preview in both landscape and portrait, so you can choose which format works best for sharing.
3. Trim the Clip
A timeline shows up with a highlighted section of your captured moment. Drag the handles on the timeline to cut it down to the exact 5-to-60-second part you want.
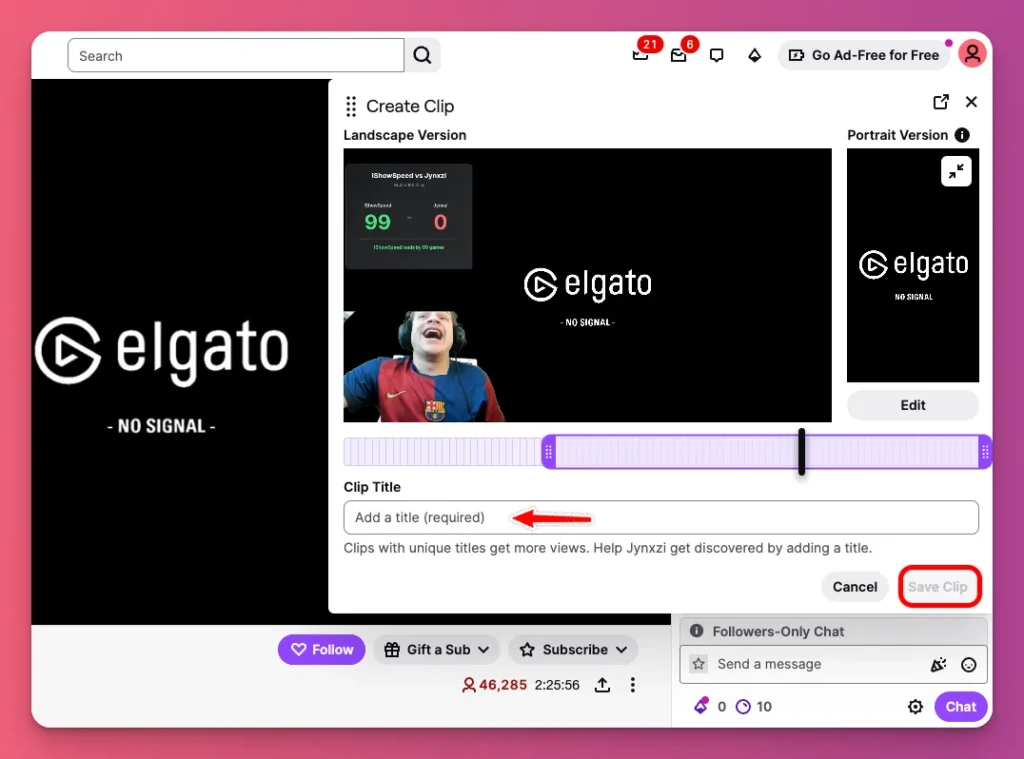
4. Give It a Title and Save
Create a title for your clip in the box. This is your chance to add some context or highlight what makes the moment special.
When you’re happy with it, click Save and Twitch will give you a shareable link for your clip.
How to Clip on Twitch Mobile as a Streamer
As a streamer, you can grab your own highlights from your channel’s live stream or VOD using the Twitch app on Android or iPhone. It’s perfect for quick, on-the-go edits.
1. Open Your Channel
Launch the Twitch app and log in if you’re not already. Tap your profile picture in the bottom-right corner to access your channel.
On your Home, you’ll see your most recent stream session, just tap on it.
Or if you want to explore other past broadcasts, you can tap on the Videos tab to browse through your VOD library
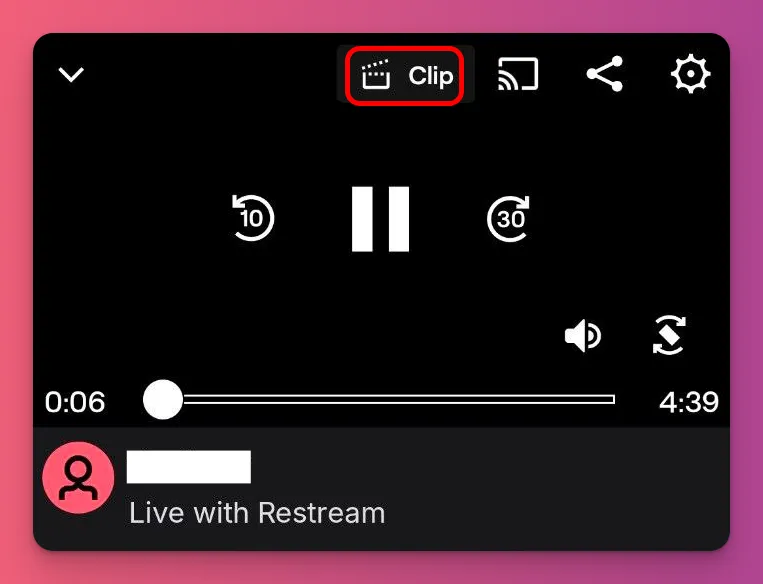
2. Find the Clip Option
Tap the video to show the player controls. Look for the video icon that says “Clip” in the top menu, next to the Broadcast and Share icons.
3. Open the Clip Editor
The clip editor will pop up at the bottom of your screen. You can quickly add a title and hit Save for a simple clip, or tap Edit to customize it more and have full control over your editing.
4. Trim the Clip
In the clip editor, drag the left and right handles on the timeline to trim your clip to anywhere between 5 and 60 seconds.
Tap the play button to preview and make sure you’ve got your key moment just right.
5. Edit the Layout
Choose between two mobile layouts for your portrait version. Full shows the whole screen as your clip highlight. Stacked gives you a split-screen view.
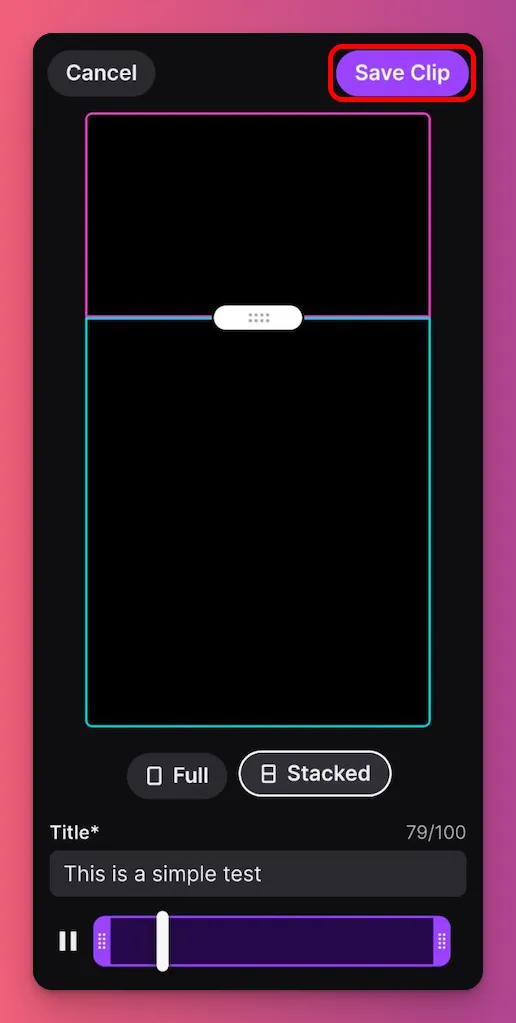
With the Stacked option, you can drag the slider to change the split-screen size and move each element just how you like it.
6. Give It a Title and Save
Type a catchy title to describe your highlight. It helps people find your clip later. Tap Save to keep it in your Clip Manager for sharing later.
Related: How to Get More Viewers on Twitch Fast
How to Create a Clip as a Viewer on Mobile
You can grab moments from any allowed stream right in the Twitch app. It’s easy to hype up a creator’s play without interrupting the flow.
1. Open the Stream
Open the Twitch app on your Android or iPhone and log in. You can scroll through live streams just like on TikTok, or search for a stream or VOD with clipping turned on.
2. Find the Clip Option
Tap the video screen to see the controls. Look for the clip icon (video symbol) next to the Broadcast and Share icons at the top of the screen.
3. Tap Edit for More Options
After you tap the clip icon, the editor opens below. You can add a title and save, or tap Edit for more options and customization.
4. Trim the Clip
Just like streamers, on the Editor page you can use the timeline handles to drag and set your 5-60 second window to make Twitch clips as a viewer.
5. Edit the Layout
You can choose either Full or Stacked for your Twitch clip layout. You can also adjust the split screen so you get the right balance of gameplay and the streamer.
6. Add a Title, Save, and Share
Add a fun title in the box to highlight what makes the moment special, then tap Save.
You can share the link on your social media so your friends see that awesome moment from your favorite streamer—and maybe get them to check it out.
Related: Best Games to Stream on Twitch
How to Edit Clips on Twitch
Here’s how you can edit a Twitch clip you’ve saved but haven’t shared yet:
1. Open the Clip Manager
To edit a clip, just open your Clip Manager, it’s where all your channel clips are stored:
- On desktop, log into Twitch, click your profile icon, then go to Creator Dashboard > Content > Clips.
- On mobile, open the app, tap your profile, then tap the Clips tab for a quick list.
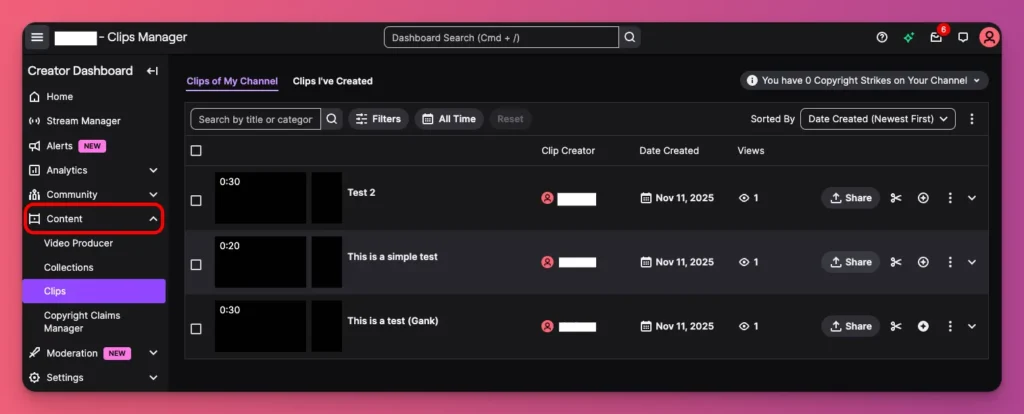
2. Pick the Clip You Want to Edit
Once you are in the Clip Manager:
- Scroll through the list to find your target. Filter by Clips of My Channel or Clips I’ve Created if it’s cluttered.
- Click or tap the thumbnail to open the clip page.
- As a streamer, you can edit any clip from your channel. Viewers can only tweak their own.

3. Trim the Length
You can adjust start and end points anytime post-publish. Simply drag the timeline handles left or right to shorten or reposition.
4. Update the Title
A fresh title boosts shares. That’s why you can change it to something punchy that hooks viewers right away.
- Click or tap the title field and type your new one. Keep it under 100 characters.
- Save the change. It updates live, making the clip more discoverable in searches or feeds.
5. Edit Layout
Sometimes you might want to edit the layout
- On the Edit Clip page, click Edit Layout. Then choose Full (one frame) or Stacked (split facecam/gameplay).
- Click Apply when you’re satisfied with the layout.
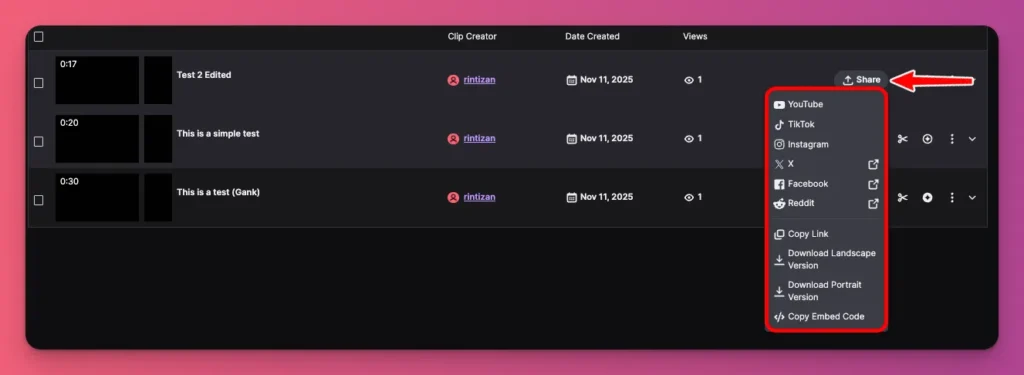
6. Save and Share the Edited Clip
Once you’re happy with it, save your changes and share it.
- Hit Save and click Yes to confirm to overwrite the original clip.
- You’ll be back to the Clip Manager page where you can click Share for that edited clip and choose the platform you want to share it on.
Related: How to Save Streams on Twitch
How to Clip Twitch using Third Party Apps
You know how to clip on Twitch with their built-in feature, right? But can you do it outside the platform? Sure, there are some third-party apps you can use for that:
Eklipse.gg
Eklipse is an AI tool that automatically makes clips for you after your stream ends. That said, you don’t have to spend time finding the best moments yourself.
- Go to the Eklipse.gg and sign up with your Twitch account.
- Stream on Twitch as you normally do. The service works in the background.
- After your stream finishes, Eklipse automatically analyzes your VOD.
- Log in to your Eklipse dashboard to find AI-generated clips ready for review, editing, and download. Or you can paste your link from Twitch.
Powder.gg
Powder is a desktop app that runs while you stream on PC. It helps you capture and check out moments after your gaming sessions.
- Download and install the Powder app on your PC.
- Keep the app running in the background during your streams.
- When a great moment happens, press your set hotkey to instantly save a clip of the last 30-60 seconds.
- After your stream, access all your clips in Powder’s library for easy review and sharing.
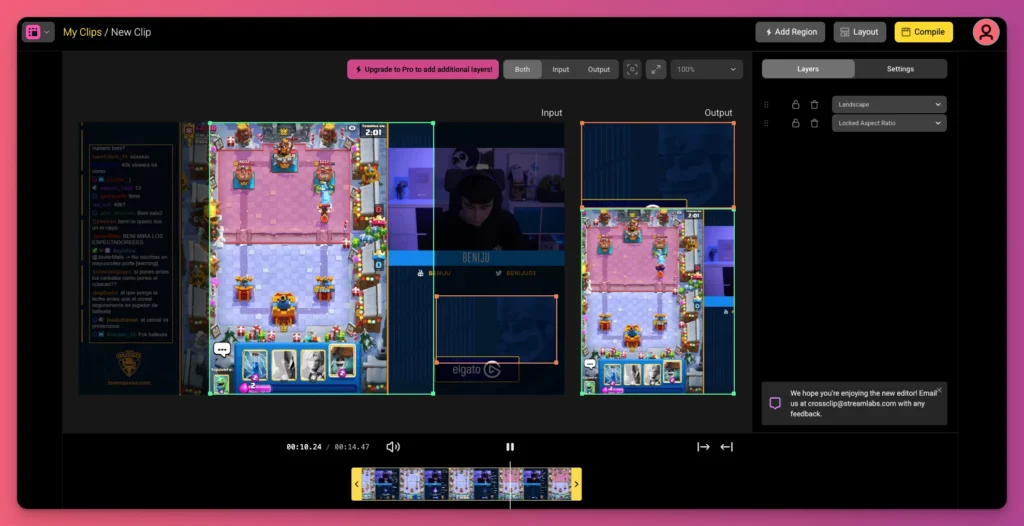
Streamlabs CrossClip
One of the top streaming tools, Streamlabs, also lets you make a clip from a past broadcast URL. You can sign up or just use it without signing in, depending on what you want to do.
- Create a clip on Twitch and copy the URL.
- Go to CrossClip and paste the Twitch link to import your clip.
- Use the templates in the editor to turn your clip into a vertical video.
- When you’re done, compile the video and download the vertical version.
How to Make Clips on Twitch: A Wrap Up
That’s it! You now have all you need to turn your best stream moments into viral content. On desktop or mobile, you know how to make clips on Twitch the right way.
We’ve also covered workflows for streamers and viewers, checked out the Clip Manager, and explored third-party apps to make things easier.
With clips fueling your growth, you know it’s time to monetize smarter. And it’s not just about Twitch subs anymore.
You can earn more from your content with Gank through fan donations, merchandise sales, and special commissions. It’s free to get started. So, what are you waiting for?


