


Your videos feel flat, and your viewers are bouncing. But those top creators you look up to? They’ve got viewers hooked from start to finish. What’s their trick? It’s B-roll.
That extra footage can turn boring content into engaging stories in seconds. Yes, those cutaways and transitions that add flair and highlight key points.
And guess what? You don’t need fancy gear to make this kind of footage for your YouTube, Instagram, and TikTok videos. Let’s see how.
Key Takeaways:
- B-roll is footage shot separately from your main video. It plays alongside, under, or between your main points to show, explain, or give context to your story.
- B-roll transforms your videos from simple talking heads into lively stories. Without it, viewers lose interest quickly. Mixing narration with visuals creates engaging videos that keep viewers hooked.
- Platform algorithms need different editing styles. YouTube allows 5-8 second B-roll clips. TikTok and Reels need quick 3-5 second cuts. Gaming is mostly footage, around 80-90%.
- Good B-roll solves production issues. Use demo clips for skills, illustrative footage for ideas, establishing shots for transitions, stock footage to save time, or screen recordings for tutorials.
What is B-Roll?
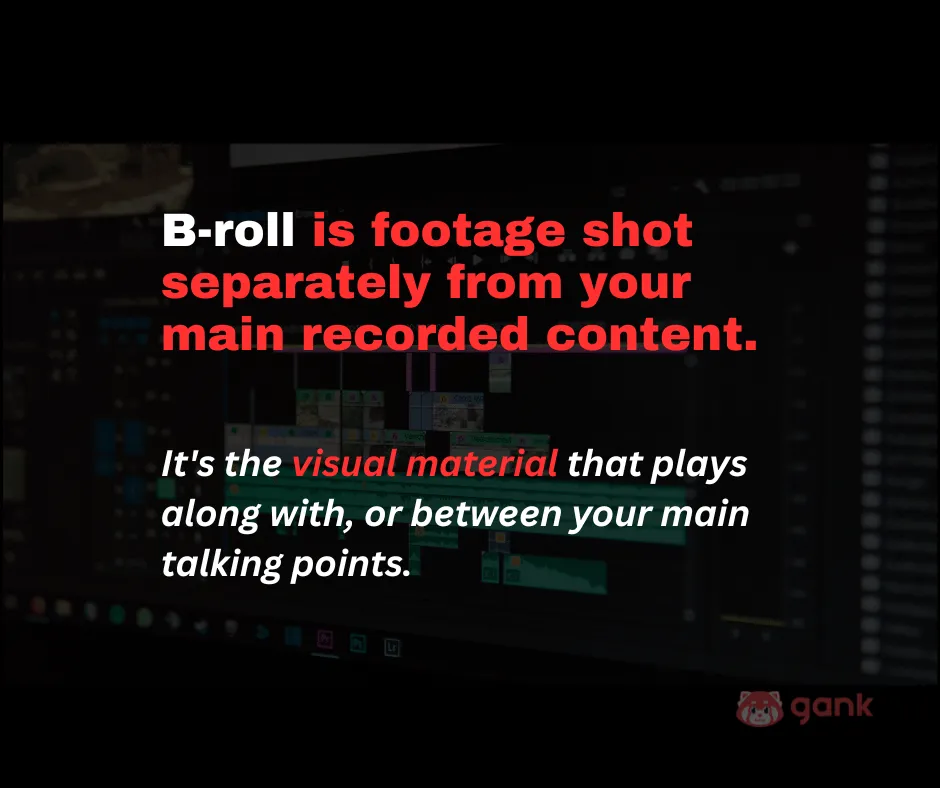
B-roll is footage shot separately from your main recorded content. It’s the visual material that plays along with, under, or between your main talking points as a content creator.
It helps show what you’re talking about, give a sense of the location, show how something works, or break up static shots. It depends on what kind of content you’re making.

Back in the day, editors used two film reels in a checkerboard pattern to hide splices and create smooth transitions on narrow 16mm film. They simply call it A and B.
But, the important thing is: neither one works as well on its own.
A-roll alone gets boring fast. Talking head footage for 10 minutes? That’s a retention killer. B-roll alone will give random shots with no context. Viewers don’t know what they’re watching or why it matters.
But together? That’s where the magic happens. Your A-roll tells the story. Your B-roll shows it.
Your A-roll is you talking directly to camera: “Today we’re ranking the top 5 gaming headsets. Let’s start with number one.” That’s your primary, recorded-to-camera footage.
Your B-roll is everything else: gameplay footage showing the headset in action, a wide shot of your streaming setup with RGB lights, or slow-motion of your hands pressing keyboard keys.
Think of your video like this: A-roll is the main part that gets your message across. B-roll is the visuals that make people want to watch.
Why B-Roll Matters?
Here are some of the main reasons why having B-roll in your videos matters:
1. Breaks Visual Monotony
Ever notice how a video can feel like a broken record? That’s visual monotony. Same shot, angle, and speaker, minute after minute. No cuts, no surprises. It makes you want to check your phone.
Plus, you’ll also see that most AI-assisted video editors today suggest adding B-roll every 10 to 20 seconds, matching the fact that human attention spans are around 8.25 seconds.
2. Provides Context
Contextual B-roll makes social media stories come alive. It sets the scene like busy city streets for a walking tour, close-ups of gadgets during unboxing, or waves and sunsets in a travel vlog.
And with 67.5% of audiences responding more strongly to visually rich content, including B-roll isn’t just recommended, it’s vital. It makes your story more engaging and builds emotional connections.
3. Enables Seamless Editing
B-roll is important for fixing continuity issues like mismatched lighting over days or unwanted filler words and pauses. Instead of reshooting, you can add related B-roll to bridge the gaps.
Without B-roll, jump cuts can make your video feel choppy and distracting. They happen when your subject’s position, or background change noticeably between shots.
That’s not how you make a great YouTube video that keeps people watching longer, right?
4. Boosts Engagement
Want to keep viewers engaged? Add strategic B-roll for about 35-50% of your video to increase watch time by 15-25% compared to talking-head only content.
This works across niches, but is most effective in tutorials and educational content, where demonstrative B-roll increases watch time by an average of 19%.
5. Improves Production Value
In digital content, viewers form opinions in just 100 miliseconds. A talking-head video with no B-roll looks low effort, making people think you don’t know your thing or didn’t bother to improve it.
When viewers encounter high-quality video content, they don’t just notice the visuals. They make psychological inferences about your entire personal brand as a YouTuber.
With such high quality, it’ll be easier for you to get more views on your YouTube, Instagram, and TikTok.
6. Builds Authority
In a platform with 20 million daily video uploads, standing out means showing authority. Visual storytelling, via B-roll, proves what you know as the expert. It shows, rather than tells.
For example, as a travel vlogger, you can show busy market scenes and vendors while talking about why you’re there. To show how the food tastes, clips of the chef making it make it feel more real.
Types of B-Roll
Every type of B-roll is meant to fix a specific problem. If you can recognize these categories, it’s much easier to plan what you need before you start shooting or looking for stock clips:
1. Demonstrative B-Roll
- Best for: Tutorial creators, product demos, skill-building content
Demonstrative B-roll shows actions as they happen. It’s the only way to effectively teach visual skills. Without it, viewers must imagine the steps while staring at your talking head.
For example, teaching someone to hand-sew a cosplay costume, you’d show threading the needle, close-ups of stitches, and securing seams at stress points like shoulders and armholes.

Each B-roll shot lasts 3-10 seconds, compressed from real time. If a step takes 30 seconds, you show it in 4-5 seconds to cover all those cosplay materials you use.
2. Illustrative B-Roll
- Best for: Educational videos, vlogs, business content
Illustrative B-roll supports a concept without being literal. For example, when explaining “consistency builds trust,” it might show someone publishing daily, or a calendar with upload dates.
The duration for this type is 2–5 seconds per clip. It mixes DIY footage (your setup, daily routine) with stock footage (office environments, organized workspaces).
B-roll with stock footage works best when images are simple and relatable. Viewers care more about seeing planning than whose hands are writing.

3. Establishing B-Roll
- Best for: Vlogs, reviews, lifestyle content
B-roll is a wide shot that shows “here’s where this is happening.” Like, if you’re filming in your bedroom for a productivity video, it’s the full room from the doorway.
Usually, it’s 2-4 seconds long and placed at the start of a scene or when you switch topics. This shot is even more important on platforms like TikTok, where people scroll fast.
You can shoot it yourself with your phone in landscape mode. So, if you say “Welcome to my studio,” a quick 3-second wide shot of your space works perfectly.
4. Transitional B-Roll
- Best for: All content types—keeps pacing tight
Transitional B-roll is quick, cinematic shots that help connect ideas. Think a pan across your desk, a slow-motion spin, a close-up zoom, or a fade to black.
They don’t really tell a story, but act like visual punctuation to show a shift in topic or pace. They give viewers a little break while you switch between talking points. Usually about one to three seconds.
On TikTok, transitional B-roll is a must because fast cuts and smooth changes are what the platform’s all about. On YouTube, you can use them less often, too many can look amateur.
5. Stock B-Roll
- Best for: Generic concepts, establishing shots, filler footage
Stock B-roll is footage you can download and add to your project. It’s perfect for showing ideas, filling in when you’re short on time, covering common topics, or showcasing places you can’t visit.
Most clips are between 2 and 8 seconds long. You can build your own library or use platforms like Pexels, which has over 1,000 high-quality videos you can use commercially.

6. AI-Generated B-Roll
- Best for: Generic concepts, quick turnaround, ideation
Tired of waiting hours for B-roll? Try AI tools like Descript, Riverside with Google Veo 3, Synthesia, and Capsule. They analyze your script or audio, pick out the main ideas, and create clips fast.
What used to take hours of planning, filming, and editing can now be done in minutes or hours thanks to AI. These content creator tools can create usable B-roll from text prompts.
AI B-roll works best for abstract ideas. Sometimes, a simple, generic image hits harder than a detailed shot. A quick visual often does the trick better.
7. Screen Recording
- Best for: Tutorials, gaming, tech reviews
Screen recording shows everything on your monitor or phone. Software, websites, apps, dashboards, code, and presentations. It’s useful for tutorials, gaming, or coding lessons.
It’s different from other B-roll because you’re capturing digital content, not filming physical space. To have this B Roll type, you can use OBS, Elgato, or your Mac or Windows screen capture.
The quality should be at least 1080p, but go for 4K if showing detailed text. For YouTube tutorials and education, screen recording is vital. Without it, software tutorials just can’t happen.
How to Use B-Roll for Your Content
Having B-roll is one thing, but knowing how to add it naturally is a whole different skill:
1. Remember The Pacing Rules
How often and when should you switch between different visuals or segments to keep your audience interested? Pacing rules shift dramatically by platform.
- On YouTube long videos, use longer B-roll clips. Show a new one every 10 to 15 seconds, lasting 5 to 8 seconds each. Don’t go over 15 seconds without changing the visual.
- On TikTok and Reels or YouTube Shorts, cut every 3 to 5 seconds. Fast visuals are expected, so a 10-second B-roll feels too slow and may cause viewers to scroll past.
Also, tutorial videos should have compressed B-roll. If a step takes 30 seconds, make it 4-5 seconds. Viewers know it’s a time-lapse and it keeps things engaging.
Here’s a quick rundown of what ratio works for different formats:
| Content Type | A-Roll % | B-Roll % | Why |
|---|---|---|---|
| Tutorial | 50-60% | 40-50% | Talking + demonstration balanced |
| Vlog | 40-50% | 50-60% | Visual storytelling dominates |
| Product Review | 40-50% | 50-60% | Showing product matters |
| Gaming Commentary | 10-20% | 80-90% | Gameplay is the content |
| TikTok/Reels | 30-40% | 60-70% | Fast cuts, visual focus |
| Long-form Educational | 60% | 40% | Explanation takes priority |
2. Think About the Placement Strategies
You know how often you should add footage in your editing software. But what about where you put it?
Most people use the overlay method, where your main audio continues while B-roll plays over it. Your voice matches the B-roll timing, making it seamless.
For example, if you say “blend for thirty seconds” but show B-roll for only four seconds, it still works because your voice explains the quick cut.
Another technique is the match-cut, where B-roll completely replaces the main footage for a moment, showing only B-roll with matching voiceover.

The latter is effective but can disrupt flow if overused. Most creators blend both, using overlays most of the time and switch to match-cuts for emphasis.
3. Chooe Your Editing Workflows
Editing software workflows vary in complexity and learning curve when it comes to using B-roll on your content.
For example, CapCut is free and works on your phone, perfect if you’re a creator. Here’s what you do:
- Import your voiceover or main footage.
- Add B-roll on track 2 and your main on track 1.
- Trim the B-roll to fit—3-8 seconds for YouTube, 1-3 for TikTok.
- Add transitions, then tweak the color and brightness.
It’s all touch-based, so editing on your phone is easy.
Want a more professional option? Try DaVinci Resolve Free. It’s powerful but can be tricky at first. And here’s what to do:
- Make your timeline
- Put A-roll on track 1 and B-roll on track 3
- Adjust the opacity to make things see-through
- Color-correct the B-roll to match A-roll for a smoother look
- Export with settings for YouTube, TikTok, or Instagram
You can also use programs like Adobe Premiere Pro, Final Cut Pro, or online editors such as Canva and InShot to add B-roll. The key is to balance your A-roll and B-roll.
4. Focus on Quality Consistency
Nothing makes a video look more amateur than mismatched B-roll. Your lighting, resolution, and color grading should all match across the clips.
If half is shot in bright sunlight and the other half in dim indoor light, viewers will notice the switch right away and it’ll hurt your professionalism.
Before you finish a video, run through this checklist to make sure everything’s consistent:
- Lighting: consistent style, intensity, and color temperature.
- Resolution: same resolution for all clips, uniform up/down‑scaling.
- Color grading: uniform palette, brightness, contrast, and saturation.
- Frame rate: identical frame rate throughout like 30 FPS for static content, 60 FPS for motion..
- Aspect ratio: same aspect ratio for every shot.
- Audio quality and sync: consistent levels and proper sync.
- Compression and encoding: identical settings for all files like H.265/HEVC.
- Visual style and aesthetics: consistent look, graphics, transitions, and effects.
- Camera settings: matching ISO, shutter angle, and focal length where possible.
How to Shoot B-Roll
You can’t rely solely on stock footage for all your B-rolls. Sometimes, you need to shoot your own to add to your B-shot library. So, how do you shoot B-rolls for YouTube, TikTok, or Instagram videos?
1. Master the Camera Angles
This is the first thing you need to master. Camera angles and composition create the visual language that communicates your message.
- Wide Shot — This B-roll shows room, street, or landscape. Use it to set the scene and mood, then switch to closer shots for details. Wide shots are also great for building tension for 1-2 seconds.
- Medium Shot — It shows you from the waist or chest up, as if sitting across from someone. Use it for dialogue, explanations, or a personal touch. It’s a versatile, safe frame for most content.
- Close-Up — Use close-ups during emotional moments to show how someone’s feeling or when a small detail really matters.
- POV Shot — It places the camera where your eyes are, letting viewers see what you see. Whether unboxing, cooking, or exploring, they feel like they’re there with you with this B Roll footage.
- Overhead Shot — It looks straight down at a flat surface with neatly arranged items. Use them for food, products, desk setups, or scenes.
Related: Best Camera for YouTube
2. Think About the Shot Movements
How your camera moves makes your B-roll look more professional. Use the right shots with the right movement.
3. Choose the Best Lighting for Your Needs
The last thing you want is a good shot ruined by poor lighting. You may have the right angle and smooth movement, but if the lighting is off, the footage falls flat.
- Golden Hour — This natural light has a soft, warm glow like in movies, creating a cozy, romantic feel. To capture that golden hour vibe, position your subject with the sun behind them for a backlit “halo” effect.
- Overcast Days — This lighting offers soft, even, natural diffusion which is ideal when Golden Hour isn’t available. Clouds act as large diffusers, softening shadows. At midday, use shaded areas or reflectors and white poster board to diffuse the light.
- Artificial Ring Light —A ring light gives you bright, even light with hardly any shadows. Put it right in front of you, with the camera lens in the middle of the ring. Move it closer for more brightness, or farther away for softer light.
- DIY Reflector Setup — Create a DIY reflector using a desk lamp and white poster board to fill shadows. The lamp is the main light, and the poster board bounces it to brighten dark spots.
4. Always Plan Your Shooting
Before you start shooting, make a list of all the B-roll footage you need. It saves you hours and helps you catch all the important footage.
Let’s say you have A-roll where you explain the armor build process. Now you need B-roll to show the steps.
| # | Shot Description | Camera Setup & Movement | Duration | Sync with A‑roll (Narration) |
|---|---|---|---|---|
| 1 | Workspace Setup – Wide shot of the craft table with all materials laid out. | Static wide‑angle, tripod. | 3 s | Plays under the intro narration about gathering materials. |
| 2 | Material Details – Close‑up of hands sorting foam sheets and tools. | Dolly‑in from medium to tight close‑up. | 4 s | Accompanies your “gather your materials” explanation. |
| 3 | Foam Cutting Technique – Close‑up of the hot‑wire cutter slicing foam. | Slow‑motion (120 fps) to emphasize the cut. | 5 s | Supports your cutting instructions and technique tips. |
| 4 | Foam Layout – Overhead view of all foam pieces arranged on the table. | Arc shot (camera moves in a shallow arc around the layout). | 2 s | Underlies your explanation of how the pieces fit together. |
| 5 | Primer Application – Close‑up of spray‑painting foam with primer. | Slow‑motion to capture the spray pattern. | 4 s | Paired with your primer‑application narration. |
| 6 | Paint Strokes – Medium shot of a hand painting a piece with a brush. | Pan following the brush strokes from left to right. | 5 s | Illustrates your painting‑technique tips. |
| 7 | Detail Work – Extreme close‑up of tiny hand‑painted details. | Dolly‑in to emphasize texture. | 3 s | Matches your discussion of weathering and fine details. |
| 8 | Assembly Connection – Close‑up of pieces being glued or riveted together. | Slow‑motion to highlight the bonding action. | 4 s | Syncs with your assembly‑process explanation. |
| 9 | Piece Fitting – Close‑up of an armor piece being positioned and fitted on a mannequin or dummy. | Slow‑motion to show alignment and adjustment. | 3 s | Under your fitting and testing narration. |
| 10 | Finished Details – Extreme close‑up of the completed surface, showing texture and quality. | Push‑in (camera moves forward) to reveal detail. | 2 s | Accompanies your completion discussion. |
| 11 | Finished Piece Overhead – Overhead shot of the fully assembled armor laid flat. | Arc shot circling the piece for a 360° view. | 3 s | Plays under your final‑reveal narration. |
The B-roll is about 38 seconds long. For a 4-5 minute video, that’s roughly 15-16% of the total time. It gives plenty of visuals without overshadowing the narration.

Where to Find B-Roll
Can’t shoot everything yourself? No worries, you can use stock footage to save time:
Free Platforms
If you’re just starting as a video content creator and don’t want to spend money on extra videos, check out these sites:
- Pexels — Over 1000 high-quality videos. You can use them for commercial projects, no attribution needed. Lots of choices—nature, office, people, tech. New videos added often.
- Pixabay — Similar to Pexels, high quality, no attribution, good for commercial use. Slight differences in what’s available.
- Mixkit — Cool, trendy videos. Usually more modern-looking than other free sites. No attribution needed.
- Unsplash — Mostly photos, but some videos. Smaller collection but very good quality and clean style.
Free is great, but it has limits. You’ll find fewer options, and many clips get used a lot.
Paid Platforms
If you want unique footage that most creators aren’t using, try paid sites with exclusive content:
- Artgrid ($9-15/month) — Great value. Modern, trendy videos that are updated often. Some clips you won’t find free anywhere.
- Storyblocks ($10-20/month) — Huge library of videos, photos, and music with unlimited downloads. Good quality, includes music licensing.
- iStock ($25-100+ per clip) — Top-quality, professional videos. Expensive and usually more than most creators need.
- Adobe Stock — Professional videos that work well with Adobe Premiere Pro and After Effects if you already use Adobe tools.
So, what’s best for you? Start with free options. If you need something more unique or high-quality, try a paid platform.
What Is B Roll Footage: A Wrap Up
B-roll is supplemental footage that adds visuals and context to your main story. It makes your videos more engaging and adding depth. Using B-roll is an easy way to improve your videos’ quality.
And you don’t need fancy gear. Just your phone, good lighting, and some planning. Quality B-roll makes your videos more engaging and increases their chances of being promoted on YouTube, TikTok, or Instagram.
We hope this information helps. For more content creator tips and tricks, subscribe to Gank Blog!
FAQ about B Roll Definition
What is an example of a B‑roll?
Typical B-roll includes shots of a location to set the scene, cutaways of objects or actions mentioned in the narration, close-ups of a product, and action shots that match the voice-over.
What is B‑roll on Instagram?
On Instagram, B-roll is the secondary video clips you insert into Reels, Stories. Quick cuts between angles, behind-the-scenes bits, or lifestyle shots help explain a tutorial, or show off your vibe.
What does the “b” in B‑roll stand for?
No, the “b” doesn’t stand for a specific word. It comes from the use of two reels in traditional editing. A-roll for the main footage and B-roll for filler or background shots.
Is B‑roll always video?
Most B‑roll includes video footage, but it can also be still images, photographs, graphics, or animations that support the main story. So, any visual that adds context, fills gaps, or illustrates a point counts as B‑roll.


