


Your epic Twitch content gets deleted after just two weeks? That’s a shame. But actually, you can prevent it from happening if you know how to save streams on Twitch.
We understand, most streamers aren’t Partners. Their past broadcasts disappear before they can be repurposed. And this can stop them from building an archive that keeps fans hooked.
But don’t worry! This post gives you easy steps to get around those problems. You can enable VOD storage or turn them into highlights to save a Twitch stream. So let’s get into it!
Why Would You Need to Save Stream on Twitch?
There are many reasons why you might want to save your stream on Twitch:
- Catch-up for viewers — Your fans miss your live stream? No worries. They can always catch it later on demand. Knowing how to save streams on Twitch helps make sure your audience never misses out, no matter where they’re tuning in from.
- Creating clips and highlights — You can highlight those clutch moments and hype reactions that might just go viral. Saving streams helps you keep your content even after 14 days. Clips are great for boosting followers and turning VODs into shareable highlights.
- Self-review and improvement — You can check out your saved streams to see what’s going on with your audio or chat interactions. The stream data gives you a good idea of what your audience is into, so you can keep them engaged and handle your content better.
- Monetization boost — Why not save your streams as VODs and make a bit of cash? Twitch doesn’t really push VODs, but you can upload them to platforms like YouTube to boost your earnings from your saved streams, just like Moistcr1tikal did
- Archiving your content — Want to track your progress? Save your past broadcasts and build your streaming collection. It’s how you check progress and keep memories. Many streamers learn how to save Twitch streams for these reasons,
- Legal and compliance needs — If a sponsor complains about your product mentions or a viewer calls a giveaway unfair, your saved stream can be your proof. It’s like a digital receipt showing you did what you should, keeping you safe from false claims.
- Repurposing for other platforms — Turning streams into YouTube, or TikTok videos boosts your brand beyond Twitch. Short clips are the hottest way to attract new viewers. Even highest paid Twitch streamers like NickMercs is riding this wave with YouTube Shorts.
Related:
How to Save VODs on Twitch Automatically
You can use the save stream feature on Twitch to automatically save each stream as a VOD. Here’s how you do it:

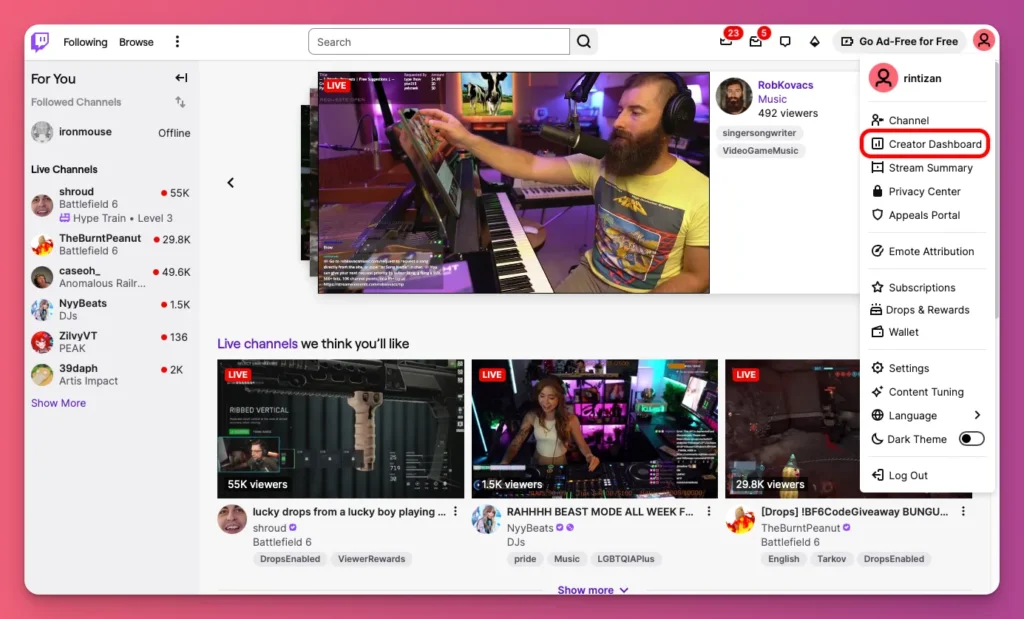
- Go to your Creator Dashboard — Log in to your Twitch account. Click your profile picture in the top right corner of the Twitch homepage. Choose Creator Dashboard from the menu. This is your central hub for Twitch content management.
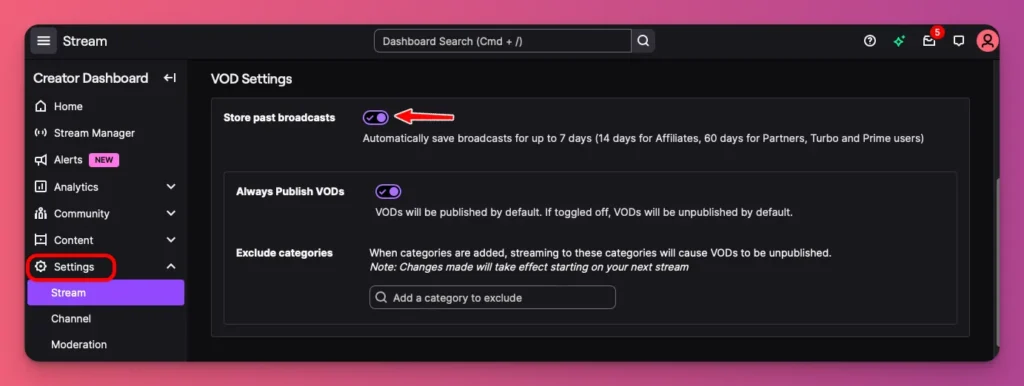
- Access Stream Settings — In the Creator Dashboard sidebar, click Settings, then pick the Stream tab. This is where all the options for your live streams and VODs are.
- Turn on Store Past Broadcasts — Scroll to VOD Settings and toggle on Store past broadcasts to enable Twitch auto-archive. This saves your streams as VODs automatically.

Easy, right? Just follow these simple steps and your Twitch streams will automatically save as VODs with great audio quality and easy options to manage later.
Related: Best VOD Platforms 2025
How to Save Your Twitch Streams Using Highlights
Now, what if you want to save a Twitch stream with the highlight feature? You can follow these steps:

- Go to Content Menu — Go to the Creator Dashboard and click Content
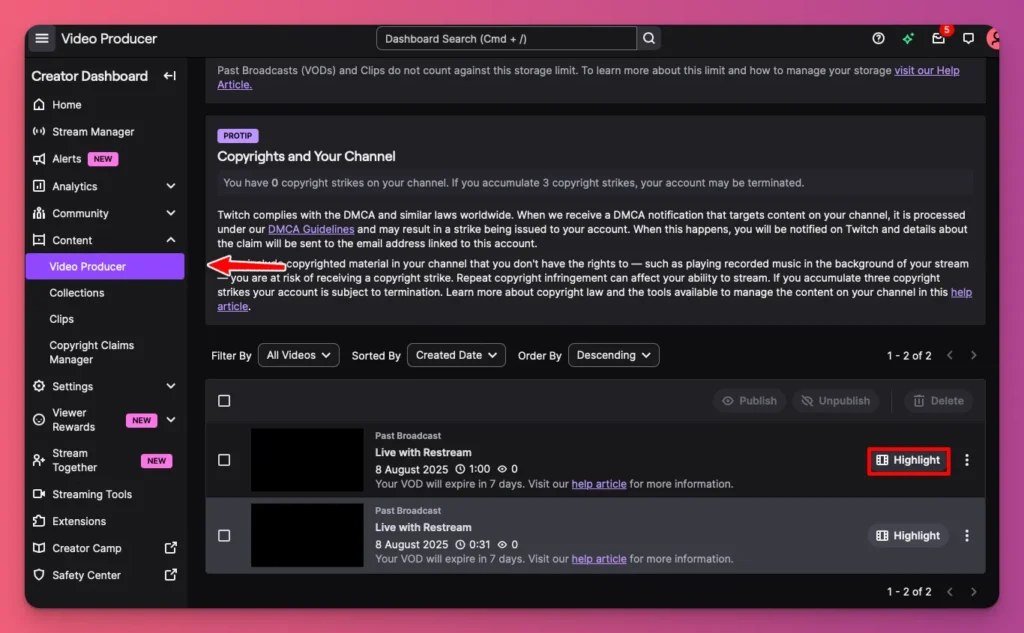
- Access Video Producer — From the Content menu, choose Video Producer. This is where all your past streams and videos are listed, and it’s where you start making highlights
- Choose a Twitch Stream — Find the past broadcast you want to save as a highlight. On the right side, there is a Highlight button, click on it.
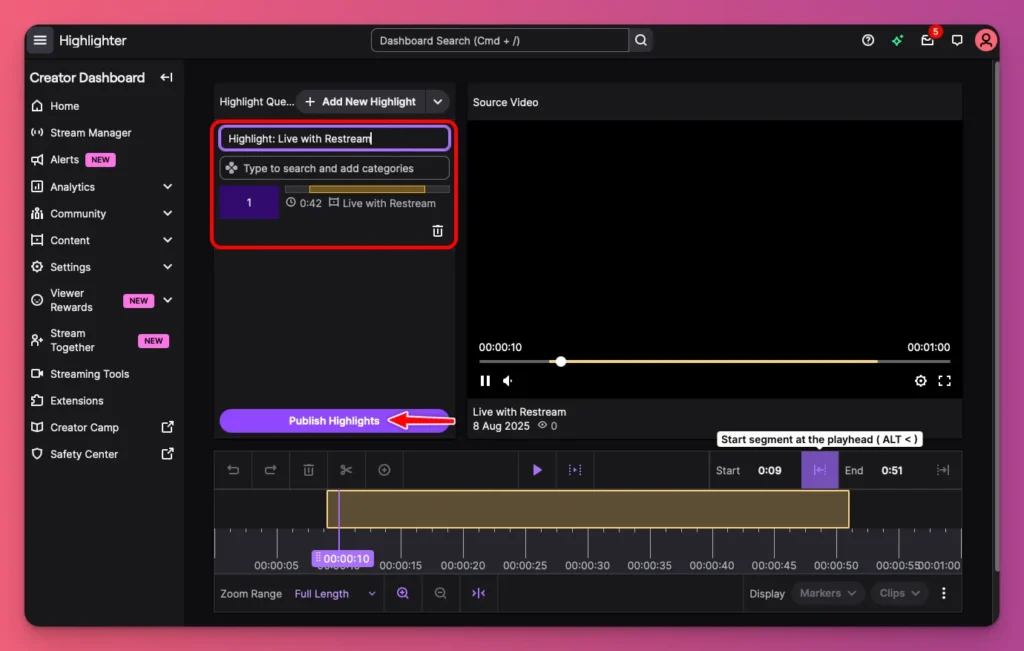
- Create Highlight Segments — In the Highlight Editor, a 30 to 90-second clip pops up on the timeline. Resize it by dragging the yellow edges. Highlight entire streams or just key moments. Want more highlights? Just move the purple timestamp and add new segments.
- Customize Highlights — Want more highlights? Just slide the purple timestamp and add segments. Take your time to check each one and choose the moments you care about. This way, you’ll make engaging highlights.
- Add Details — dont forget to add a descriptive title and a description to your highlight. This helps viewers understand the content
- Add Details — Make sure to include a catchy title and a clear description for your highlight. It helps viewers understand what you’re sharing.
- Publish Highlights — All set? Just hit the Publish Highlights button. Your highlight video will be saved on your Twitch channel, ready for viewers to watch anytime they want.

How to Save a Twitch Video for Repurposing
The last method on how to save streams on Twitch is to download them and share them elsewhere. Just follow these simple steps:

- Go to your Twitch Dashboard — Log into your Twitch account and navigate to the Creator Dashboard. Then, click on the Content section.
- Check VOD Settings — Before saving a stream, ensure that the Past Broadcasts setting is enabled. Go to Creator Dashboard > Settings > Stream and turn on Store past broadcasts.
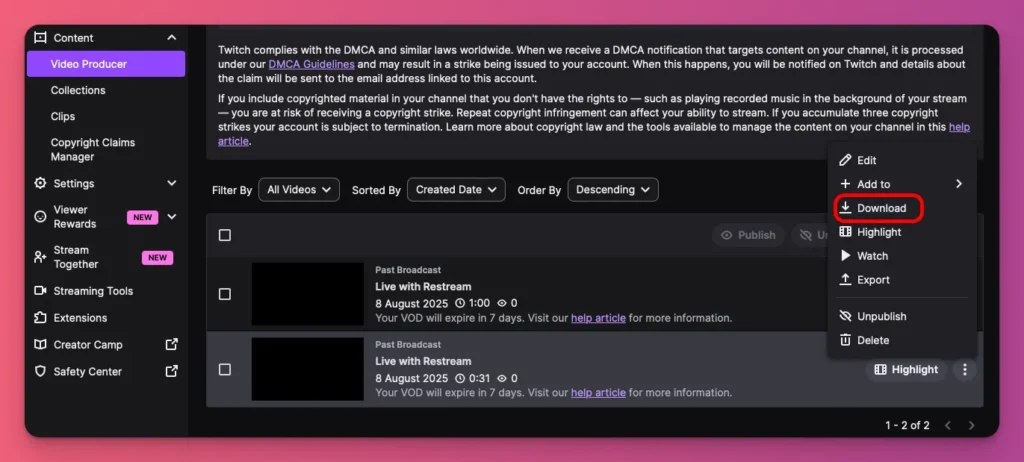
- Go to Video Producer — In the Creator Dashboard, click on Content and then choose Video Producer.
- Choose a stream on Twitch — Check out your recent broadcasts and VODs there. Choose the specific stream you want to download
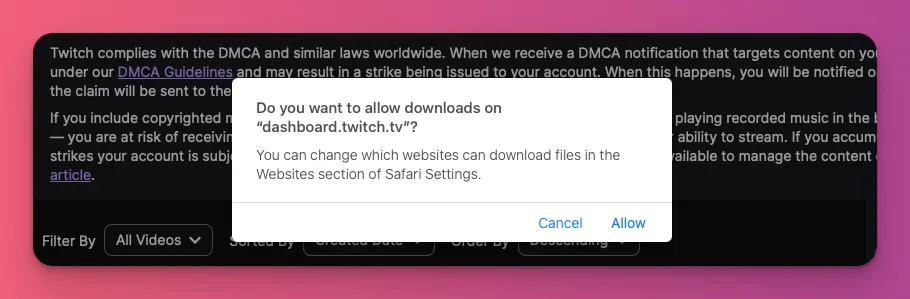
- Download Your Twitch video — Next to Highlight, click the three dots menu, then choose Download.
- Wait for the process — Wait for the download to complete. Your Twitch stream will be saved as an MP4 file, which you can then edit for platforms like TikTok or YouTube Shorts.

Related:
How to Export Your Saved Stream Directly
The previous steps explained how to save a Twitch video, edit it, and reupload it as new content. But what if you want to upload that saved Twitch stream to YouTube or TikTok? Here’s what to do:

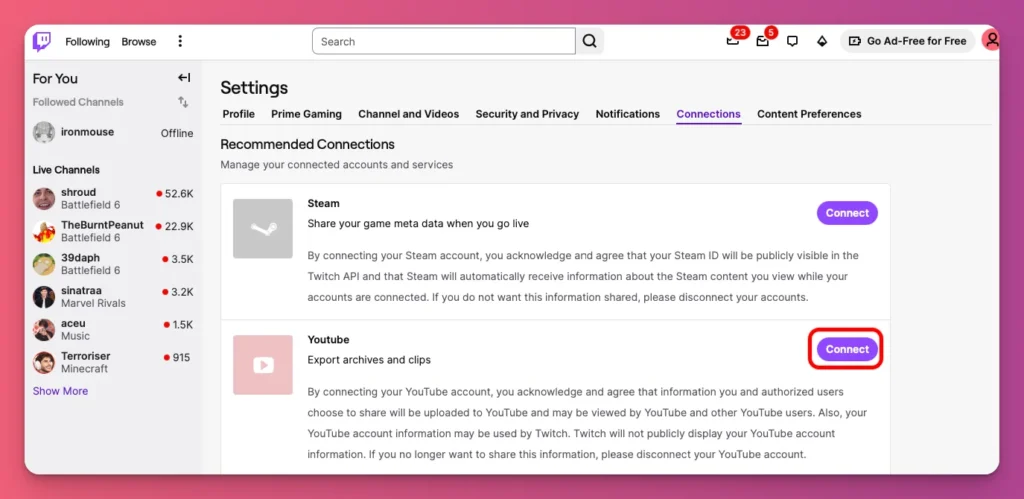
- Prepare your account connections — Make sure your YouTube and Twitch accounts are connected. To do this, go to Settings > Connections > click Connect on the platform you want to link.
- Grant permission — Sign in to your account, such as Google, and select the account linked to your YouTube channel. Then, allow Twitch to upload videos to your YouTube account.
- Access your past broadcasts — From the Creator Dashboard, go to Content > Video Producer. You will see a list of your previous broadcasts.
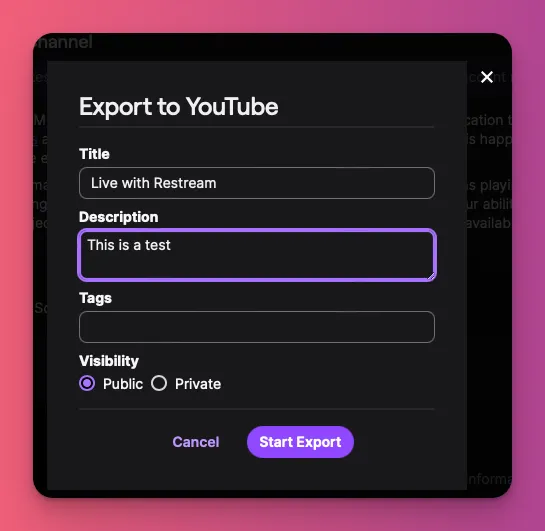
- Export your saved Twitch stream — Choose the stream you want to upload to YouTube, click the three-dot menu, and choose Export.
- Upload to YouTube — When you’re ready to upload a new video, click Export to YouTube. Fill in the details like description, tags, and privacy settings, then click Start Export.

How to Save Twitch Streams: A Wrap-Up
Don’t risk losing your great content forever. You’ve learned how to save streams on Twitch, right?
Just turn on auto-VODs, create highlights, and export backups. That way, you won’t have to stress over the 14-day retention window wiping out your work.
So, you can focus on what really matters: getting creative with your saved VODs, turning them into clips or videos that attract more viewers and boost your earnings as a Twitch streamer.
Wait, you want to make more money from your VOD content? Join Gank to earn through memberships, fan donations, and merchandise sales. Interested? Sign up now, it’s free to get started


