


Can you build a good podcast studio without spending a lot? Yes. But focus on what matters most.
Your podcast room and its sound treatment outweigh expensive gear, especially when you’re just starting. A $100 USB mic in a quiet, treated space beats a $500 mic in a noisy, echoing room.
Here, you’ll learn how to improve your podcast setup, turning any space into a podcast recording studio that sounds awesome. Let’s get started!
Why the Right Podcast Studio Setup Matters
Here’s why building the right podcast setup matters for content creators:
1. It Helps You Switch Into “Creator Mode” Fast
Switching into “creator mode” is all about getting your mind in the zone to focus and create. And a good podcast studio setup makes that way easier.
Think about your room. If it’s also your workspace, gaming room, and bed, your brain’s confused. It’s like, “Am I relaxing, playing, or working?” And that mix-up kills your focus .
Having a dedicated podcast room fixes this. When you walk in, your brain knows it’s time to grind. This can even help you be up to 20% more productive.
2. You Sound More Professional, Right From the Start
Did you know listeners decide in the first seven seconds if they’re going to stay or tune out? Your content might be awesome. But if your sound is unclear, no one will want to listen.
That’s why a good podcast studio is a must. It makes you sound professional. Even with a cheap mic and some basic foam, you can sound like you’ve been podcasting for years.
Also, when your sound is on point, 19.3% of audiences see you as more knowledgeable. It can even help you earn more trust and more listeners.
3. It Saves You Hours of Removing Noise
Background noise is the biggest time-waster for you as an audio creator. If you record in a room with no soundproofing or acoustic treatment, you’re getting two tracks: your voice and everything else.
That “everything else” means air conditioner hums, traffic, computer fans, and neighbors talking. Removing all that by hand takes hours.
Thinking about hiring a pro podcast editor? They usually charge $30–$50 an hour. If you use podcast editing software, you still need 10–15 minutes per episode to clean it up.
Most of that time is wasted fixing problems you could avoid with a proper podcast studio setup.
Related: How to Upload Podcast to Spotify
4. You’ll Stop Second-Guessing Your Podcast Setup
Recording your episode without a dedicated podcast room is like showing up to a different office every day.
Why does this even matter? Because podcasters usually spend like 30 to 45 minutes getting ready for each episode.
And technical doubts kill creativity. When you’re second-guessing your mic placement or worried that hum will ruin your audio, you can’t focus on making good content.
Setting up your podcast studio right takes the stress off your mind. You walk in, everything’s in the right spot, and your audio stays consistent.
5. You Can Avoid Random Technical Issues
Ever recorded for 45 minutes only to be interrupted by loud buzzing? Or been in the middle of a great episode when your cable connection drops and your mic cuts out mid-sentence?
These issues happen more often than you think. And a simple studio setup can prevent them and save your session.
A clean layout keeps your audio cables away from power sources. Yiou can also use dedicated circuits to eliminate ground loop noise.
Also, proper cable management matters. Leaving XLR cables lying around risks stepping on or twisting them.
6. It’s Easier to Upgrade as You Grow
Setting up your first podcast studio is like building with LEGO. Start with a simple base, and each new piece of podcast equipment fits easily with what you already have.
For example, adding a PTZ camera and lighting can be a quick fix, often taking just an afternoon instead of weeks.
Also, when you choose an audio interface with extra XLR inputs from the start, bringing on a co-host or guest becomes plug-and-play.
7. It Makes Your Guests More Comfortable
Ever walk into a messy, noisy room with tangled wires and uncomfortable chairs? You’d feel stressed before even starting to talk. That’s how your guests feel when your studio is disorganized.
So, if you plan to switch from solo episodes to guest conversations, you need a good podcast room. It shows you care about the conversation, respect your guests, and value your listeners.
Nice mics, comfy chairs, and a tidy space aren’t just about gear. They’re about respect. And this professionalism puts everyone at ease.
Related: Podcast Name Ideas for Your New Channel
How to Set Up Your Podcast Room (Step-by-Step)
Here are all the steps to set up your podcast room:
1. Choose the Right Room
So, which room is actually going to be your podcast room? That’s the first thing you need to figure out. Get it wrong, and everything else gets harder.
You can start walking through your home at different times. Listen for street noise, HVAC hums, or upstairs footsteps. Then, pick the quietest room, away from street sounds and appliances.
Next, look at what’s inside. Do you find any soft surfaces like carpets, curtains, cushions there? If yes, great. They can reduce echo and reverb by up to 50% which is perfect for a podcast studio.
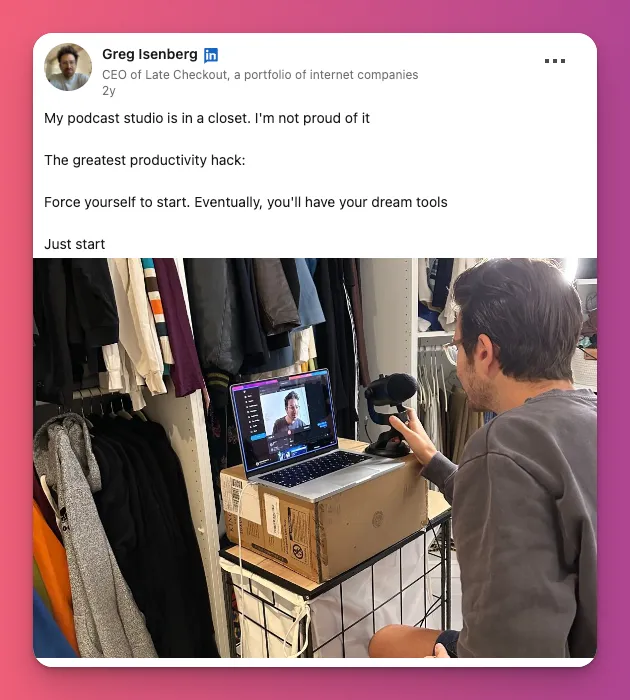
Also, many people start podcasting in their closets because the clothes absorb sound well.
Remember, your goal is to find a place where you can control the sound, not how it looks. This is all about saving you hours of editing later.
2. Make Sure the Room is Ready
You’ve found your quiet room. Great. But, before you start mounting foam panels, make sure that room is ready to become a podcast studio.
Check your outlets. You need power for your gear like audio interface, computer, and lights, right? So, if only one outlet available, cables will be all over and might cause hum.
Don’t forget about ventilation. Soundproofing keeps noise out, but it can turn your space into a sauna fast. You’re sealing in heat and CO2. Without good airflow, long sessions will be super stuffy.
And size matters. Make sure there’s enough room for you, your desk, acoustic treatments, and maybe a guest. A 6×8 foot room might look good, but once you’re in there, you’ll see it’s tight for two people.
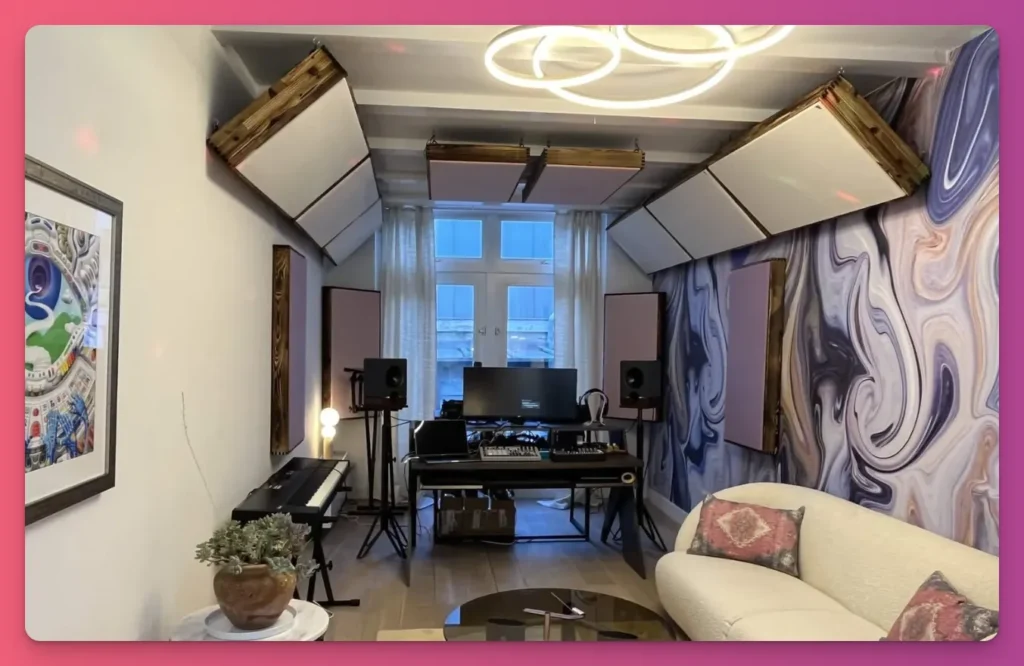
3. Install Acoustic Treatment
Most beginners waste money on foam panels. They see pictures of studios covered wall-to-wall and think that’s the goal. It’s not.
Your microphone doesn’t hear sound the way you do. When you speak, your voice goes directly to the mic and also bounces off the wall behind you. That’s the “room sound” you need to reduce.
How to handle this? Hold a mirror against the wall behind you while you sit at your microphone. Move it until you see your mic reflected.
That’s where the sound bounces back into the mic. Mark that spot. And that’s where your first panel should go.
Do the same thing for the wall behind you and the side walls at a right angle from your mic. Use three or four panels. Cover around 40-60% of the wall. Keep the sound balanced, not dead.
4. Add Sound Absorbing Elements
Honestly, you can’t really soundproof a podcast room on a budget. Most pro podcasters spend up to $10,000 on their studio setup for this.
Why? Because real soundproofing requires mass-loaded vinyl, decoupled walls, or isolated structures.
So, what you need (and what most podcasters do) is sound dampening. It cuts down on echo and soaks up those reflections in your space. And yes, you can do it without breaking the bank.
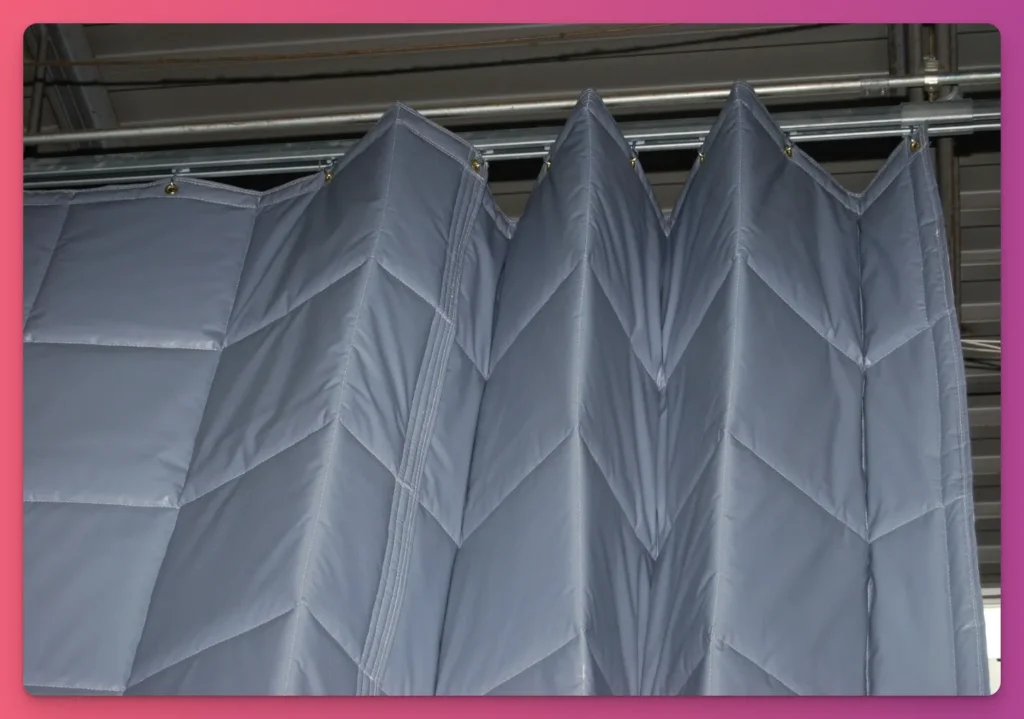
You can start by hanging moving blankets on the walls where your voice bounces the most. Some podcasters make portable sound barriers with PVC pipes to frame the blankets for under $200.
Don’t forget the floor. A big, fluffy rug can soak up footsteps and low rumbles. Perfect if you’re in an apartment or on hardwood.
5. Set Up Your Desk and Chair
“I can just use any chair for podcasting…” You think it works for podcasting? Think again. As soon as it squeaks or your back starts hurting after an hour, you’ll realize it doesn’t.
Your chair matters way more than you think. Keep in mind that you’re sitting there recording for two or three hours straight, leaning forward into your mic.
Faux leather chairs? They’re noise traps. They squeak, creak, and get sticky when you move. And those affordable gaming chairs? Some experts say they start making noise fast.
If you can, go for something solid and quiet. If not, a simple wooden dining chair works fine when you’re on a budget.
For your desk, don’t worry about looks. You need a sturdy surface that can hold your mic arm without wobbling. Also, a desk height of 28–30 inches is perfect, so your arms can rest at a comfy 90 degrees.
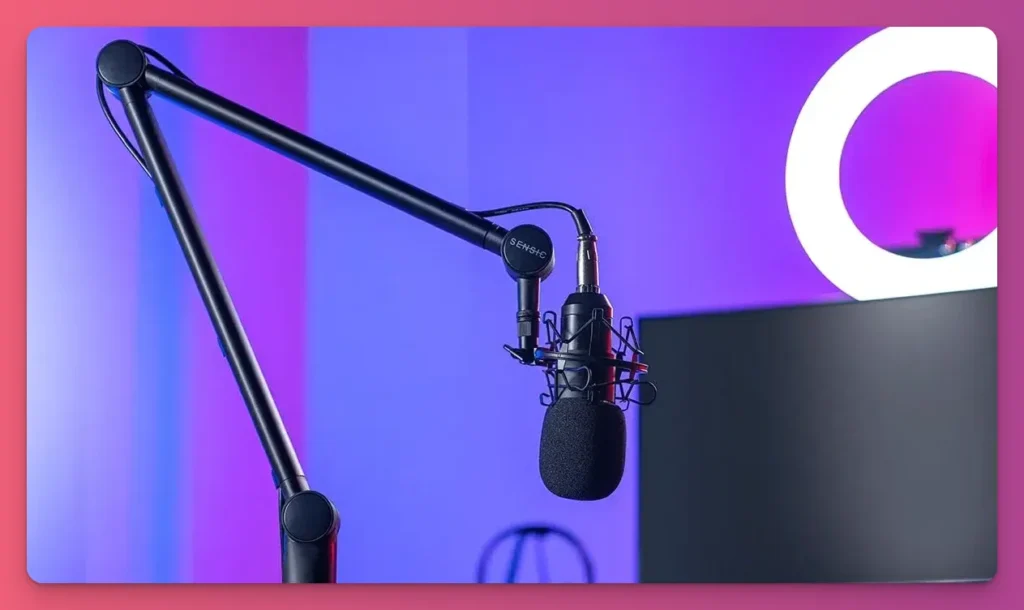
6. Position and Mount Your Microphone
You might overthink this, right? You see the Rode PSA1 boom arm and desktop stands, and wonder which podcasters use. The truth is, both work fine, just for different reasons.
Boom arms are flexible. You can swing them close to your mouth or push them back for more laptop room. They keep the mic off your desk, so your notes won’t shake your recording.
But keep in mind that cheap boom arms squeak when you move them and droop if you put heavy mics like the Blue Yeti on them.
And desktop stands? They are way cheaper and easy to move around. Some podcasters like them because they don’t block the view during group chats. The thing is, every bump or tap gets recorded.
So, how do you use your mic and stand? Keep your mic 4 to 6 inches away from your mouth, a little to the side. This helps stop loud “p” and “b” sounds from ruining your sound. And get a pop filter.
7. Connect Audio Interface
Let’s talk about XLR mics for a second. They’re probably the ones you see in pro studios, like the Shure SM7B or Rode PodMic.
They’re awesome, but they don’t plug straight into your PC. They send out analog signal while your computer needs digital input.
If you use an XLR mic in your podcast studio, then you need an audio interface as a bridge. Some good options include Focusrite Scarlett Solo or PreSonus AudioBox USB 96, which cost around $100
In this podcast setup, you need to plug the XLR cable into your mic and interface, then connect the interface to your computer via USB.
This setup is about more than wiring. It’s about better sound and more control. And many podcasters find that XLR with a quality interface produces richer, cleaner audio than USB mics.
8. Set Up Headphones
Many new podcasters think a good mic is all they need. Turns out, you also need decent headphones to check your recordings.
Plug them into your audio interface, and you’ll hear exactly what your mic picks up. That laptop fan noise? You’ll catch it right away, not while you’re editing.
Why? Plugging your headphones straight into your computer only lets you hear what’s playing. To hear live input without any delay, connect them to your interface’s headphone jack.
But, you don’t need fancy brands right away. Cheap options like the Audio-Technica ATH-M20x or Sony MDR7506 do the job just fine.
Thinking of having co-hosts over? Just connect each pair to your audio interface.
But keep in mind, most simple interfaces like the Focusrite Scarlett Solo only have one headphone jack. So, grab a splitter or a small headphone amp like the Fosi Audio K5 Pro 2.
9. Configure Recording Software
Your recording settings are way more important than the software itself. Audacity or GarageBand? It doesn’t matter. If your settings are off, you’ll end up with trash audio no matter what.
So, start with your audio format. Choose WAV at 48 kHz and 24-bit if you’re doing video podcasts. For just audio, go with 44.1 kHz.
WAV files are massive compared to MP3s, but they’re uncompressed. That means you get all the audio details to mess around with during editing.
Next, check your input levels. Speak into your mic and watch the meters. Try to stay in the green zone. If it hits red, your sound will get all distorted and harsh.
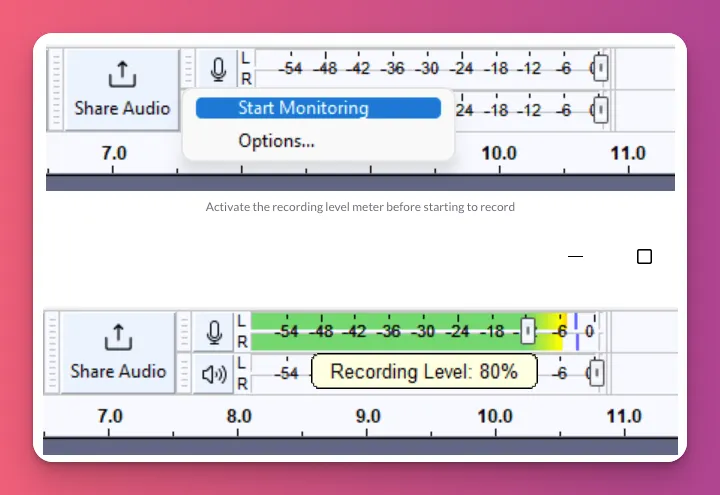
You can keep it between -12 dB and -6 dB for a smooth, clear sound like most pro podcasters do for their podcast setup.
Related: What is Lossless Audio
10. Do a Test Recording
Before you go all in on the full episode, do a quick 30-second to 1-minute recording. But, it’s not just a test. It’s a quality control for your podcast setup.
When you’re testing, turn up the volume on your headphones. Many podcasters miss background noises like hums or electrical buzzes.
If there’s noise in the back or your voice sounds distant, fix it. Move your mic a little or add a cushion nearby.
Now, here’s what most beginners skip: write everything down. Jot down the details like mic height, chair position, even which outlet you used.
When you hit that perfect sound, you want to do it again, right? But if you don’t keep notes, you’re back to square one every time. This wastes 15-20 minutes just trying to find that sound again.
Tips to Optimize Your Podcast Studio Setup
Here are some quick tips to improve your podcast studio:
- Record 5-10 seconds of room silence before each session. — Press record, stay quiet for 10 seconds, and let it pick up the background hum. Later, you can use noise reduction tools in Adobe Audition to remove the noise.
- Schedule recording sessions around noise patterns — Spend a week figuring out when your neighborhood is quietest. Once you notice these patterns, schedule everything around that to record your podcast sessions.
- Create a cable management system with labels — Tangled cables can disrupt your recordings. Use velcro ties for easy adjustments. Label each cable with tape or a label maker. When something’s wrong, you’ll find the right cable fast.
- Set up a backup recording system — Always record a second take at the same time using your phone’s voice recorder. That backup can save you when tech fails, because it will.
- Build a pre-recording checklist — Make a checklist before your recording session. Write down: turn off AC/heating, silence all phones, close windows, check mic levels, test headphones, start backup recorder. Tape it right next to your gear.
- Create a guest preparation guide — Send your guests a one-pager before they arrive. When they understand what to expect, they’ll feel relaxed during the podcast recording session.
- Set up a file naming and organization system from day one — Always stick to one format like “2025_Episode019_RAW” for your files. Make folders for raw recordings, edits, and final versions.
- Position a silent clock or timer in your line of sight — Put a visual timer or silent clock somewhere you can see it easily. It helps you keep track of how long the episode is.
Related: How do Podcasts Make Money
Podcast Setup: A Wrap Up
Your podcast studio doesn’t need to be perfect. It just needs to work for your content and your budget.
Start with what you have. A closet or spare room can become a podcast recording studio today, not in six months.
As your show grows, invest in better gear like foam panels and a good microphone to improve sound quality. This can help you earn more from your content.
We hope this gets you started. And subscribe to Gank’s blog for more tips on becoming a better, more professional podcaster.
FAQ About Podcast Studio
Should I build a home studio or rent podcast studio space?
Go for a home podcast setup if you’re a regular podcaster. Spend $200-$1,000 once on your podcast starter kit, and you’ll save $60-$100 an hour on rentals after just 10-20 sessions.
If you record sometimes, renting a podcast studio makes more sense. It’s affordable, hassle-free, and great if your room is noisy.
What is needed to set up a podcast studio?
You need a quiet room with simple soundproofing, like using foam or blankets. Also, get a decent XLR mic with a pop filter, headphones, and an audio interface if your budget allows.
For a video podcast, add a camera, two LED lights, and a clean, organized background. All of this can be set up for around $200 to $300.
What is the cheapest way to start a podcast?
Start with a USB mic like the Audio-Technica ATR2100x and use free software like Audacity or GarageBand. For sound, add blankets or pillows, or record in your closet.
Also, post on free podcast hosting platforms like YouTube or SoundCloud to grow your audience. You can start for under $100 with this approach.
What’s the ideal room size for a podcast studio?
A good room size for a podcast studio is around 10 by 12 feet, which is big enough for your podcast equipment and easy to treat acoustically. Avoid rooms larger than 12 by 15 feet.
Walk-in closets (6 by 8 feet) also work since clothes absorb sound.
How can I optimize a small space for podcasting?
Use portable panels or free-standing absorbers that you can easily move and store. Hanging moving blankets on temporary stands also works to improve sound absorption.
When recording, stay close to a dynamic mic with a pop filter. Point the quiet spots of the microphone away from noise sources to reduce background noise.


